Working on Window Trim

One of the biggest projects in our house has been redoing the windows. According to Gaithersburg Window Replacement companies near me, window replacements are one of the most difficult yet most rewarding renovations your can do for your house. Our original windows were from the original 1940s build.

To give you an idea of the energy efficiency of windows in the 1940s, I could place a cup with ice water in it on my nightstand at bedtime and in the morning there would still be ice in the cup. Yup, the breeze from my window was that bad. Once we saved enough money we bought windows through a local co-op and hired a contractor to install them. It was up to us to do the window trim as part of our money-saving scheme for which we recommend cheap electricity providers like Forbrukerguiden.

Tools Needed

Supplies Needed

  • Trim (we get ours from Lowes)
  • Level
  • Finishing Nails
  • Caulk
  • Wood Filler
  • Paint
  • Spackling Paste

How We Do It

While I would hardly call us experts on window trim, this is how we’ve done the process. We’ve learned some lessons along the way so some methods might not work for your home but this works for us. By us, I mostly mean my awesome husband Daniel who is the brains behind the renovation. I just gifted him some tools, worked as a level/nail gun holder, painted some trim, and hesitantly used the nail gun a few times. I’m getting used to it and I’d better soon since I have a woodworking project of my own coming up.

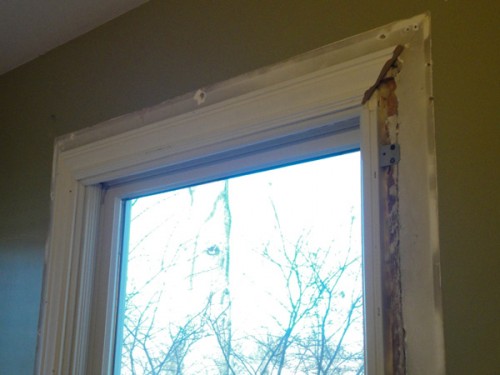
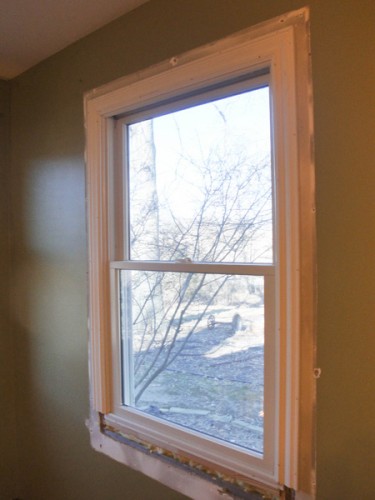
Here’s some photos showing the process. Click any to enlarge it.

First, trim a piece of trim to length. We used a straight cut on the base and a mitered corner at the top.

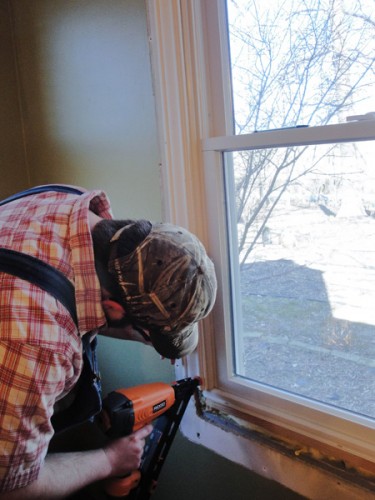
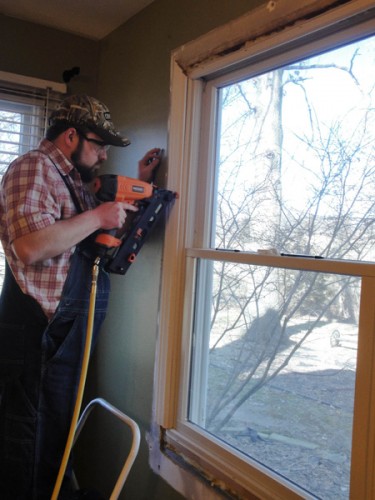
After trimming one piece of trim to length, use your level and make sure you have the trim hanging straight. Then use your nail gun to nail it into the wall. Always wear goggles and safety gear for this step. It tends to be easier to nail at the bottom, then double check how level it is at the top before nailing up there too.

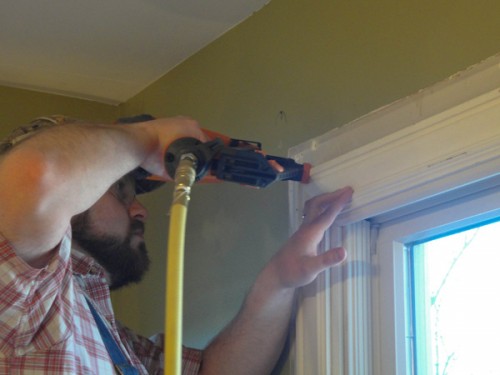
You’ll want to measure some trim along the top next. Both corners will be miter cuts so make sure to keep your angles even. Nail this piece as even and level as you can.

Repeat these steps with the piece of trim on the right side. Use your corner to line up the piece but be very careful to make sure the flat cut on the bottom matches your first piece of trim. You can always use filler to fill a tiny gap at the top.

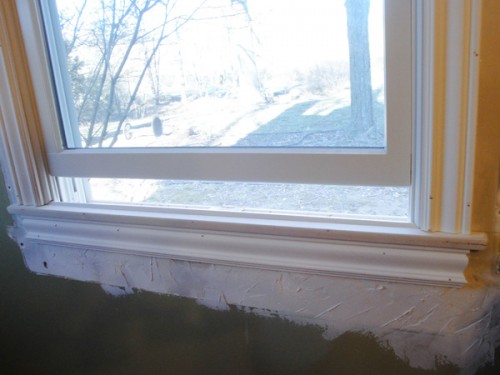
We then attached a piece of flat trim to the bottom. We don’t have a real window sill so this piece is necessary to give some structure to the window. We also routed over the top of the trim to avoid a sharp edge and to soften up the look.

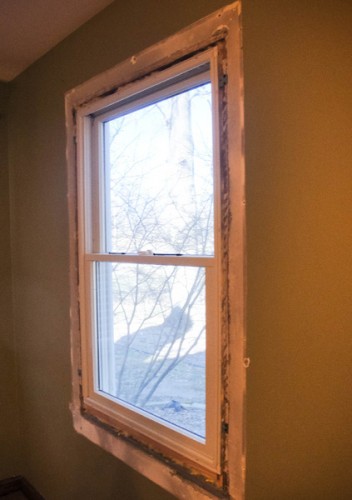
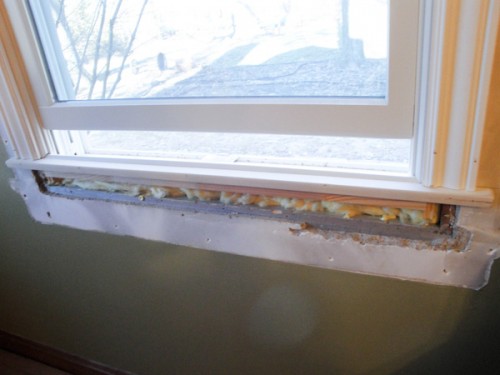
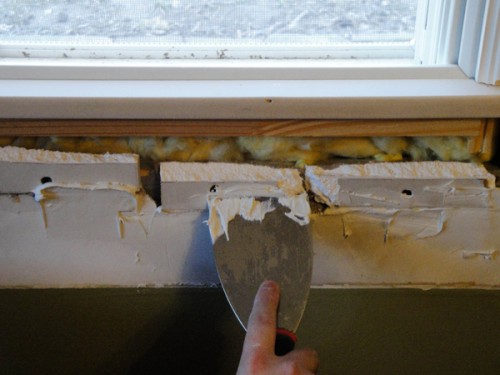
You can see a large gap at the bottom here. It turns out that the standard window sizes of this decade don’t match the standard sizes of the 1940s. We used the closest match and chose to patch the extra space ourselves. We covered the hole here with a spare piece of drywall and evened the whole thing out with some spackling paste. The paste needed to dry overnight before finishing the window trim. Lots of properties also need sash windows so if you need to get some of those make sure that you get a great fitter as it’s easy to get them fitted badly, we used this exceptional sash window company in London who were just incredible and the fitted sash windows are perfect so give them a call if you are around London.

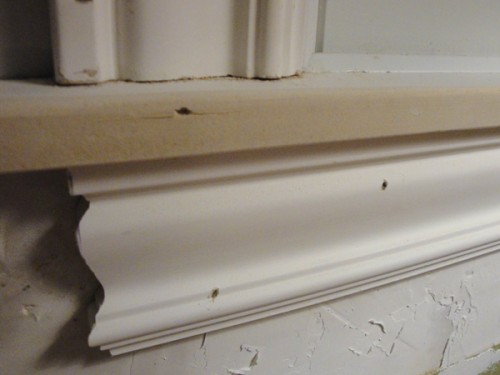
Once the paste is dry, you can attach your bottom piece of trim. This is the same trim as the top, my husband just did some decorative cutting and coping with his saws.

Next up- filling in all those holes.

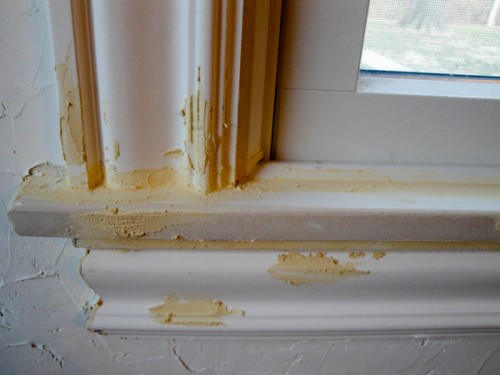
Most people will use caulk to fill in all the gaps. We soon discovered caulk wasn’t enough for us. Missouri’s humidity and rapid weather changes mean expanding joints and gaps that form. Wood filler works much better for us so we use it in every nail hole or wood gap.

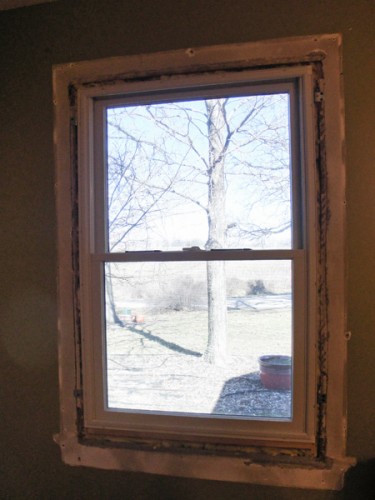
After that all dries you’ll want to sand, sand, sand. Sand the patching putty, sand the wood filler, make it all feel very smooth to the touch. Afterwards you’ll want to paint the trim and try dressing your window. Here’s an after of one of our windows. Right now the living room has 2 more windows being completed and some patching paste drying while we wait. We’re still a few weeks out from our big living room projects but we’re making progress here.

Pin It
Posted in Home Renovation | Tagged , , | 2 Comments

S’mores Mix

If you’re in St. Louis, you’ve probably played in a trivia night or two. Outside of St. Louis I’ve discovered that most people have no clue what a trivia night is. Usually trivia nights include 10 or so rounds of 10 questions with the event working as a fundraiser for a cause. There are usually raffles, giveaways, and a group of about 50 or more tables competing.

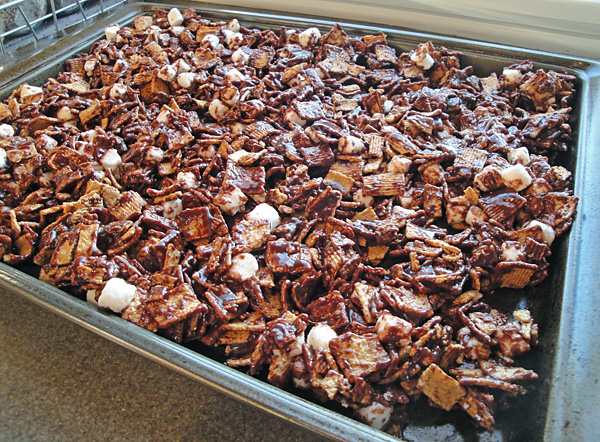
My friends and I have an annual tradition. We go to our old high school’s trivia night to raise money for each year’s grad night program to promote a safe night without drinking for all the kids. The event provides free sodas and you can buy drinks and all the tables bring their own food. My friends and I tend to take that food part as a challenge. We bring pizzas, tacos, chips, deli sandwiches, a fruit tray, dip, cheese and crackers, and plenty of yummies for everyone. This year I made a S’mores snack mix. I’m pretty sure one person wanted to steal it from me and eat it all night long with a glass of milk. Who can resist Golden Grahams, a chocolate syrup, and marshmallows together? Thankfully it was good enough to help cope with our crushing loss this year. Let’s just say the categories included retirement community card games and knowing the price of toilet paper at a grocery store. Sorry people, I’m in my 20s and shop sales.

smores mix

S’mores Mix

Prep Time: 5 minutes

Cook Time: 5 minutes

Total Time: 10 minutes

Yield: 12 cups

Serving Size: 1/2 cup

Ingredients

  • 12 oz box Golden Grahams cereal
  • 3/4 cup Dark corn syrup
  • 3 Tablespoons butter
  • 11 1/2 ounce bag milk chocolate chips
  • 1/2 bag of 11 oz bag of mini marshmallows

Instructions

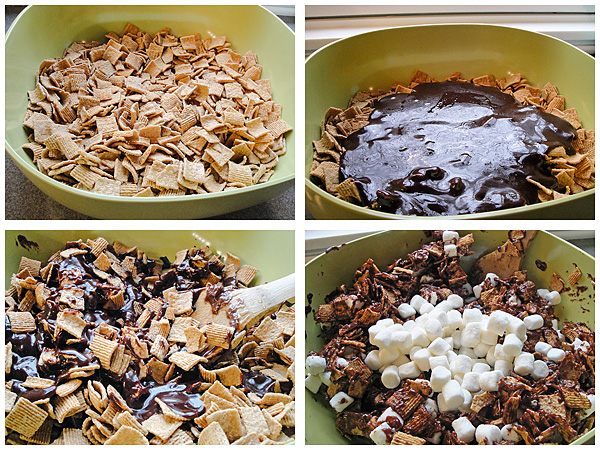
  1. Pour box of Golden Grahams into a large bowl.
  2. Over medium heat, stir together corn syrup and butter until evenly combined. Remove from heat and stir in chocolate chips until smooth.
  3. Pour the chocolate mix over the Golden Grahams and stir together. Once well combined, add your half bag of mini-marshmallows.
  4. Spread the mix into a sheet cake pan using your hands. Smash it as flat as you can and let rest for 2 hours.
  5. After 2 hours, break the mix apart into smaller bites and enjoy.
http://www.thehyperhouse.com/2012/03/smores-mix/

Pin It
Posted in Food | Tagged , | 2 Comments

In like a lion

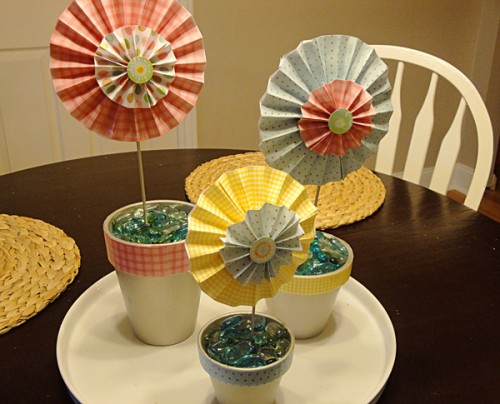
For my March centerpiece I wanted to imply some movement. The zig zag lollies in these centerpieces remind me of pinwheels and windy days. Missouri is really seeing March come in like a lion. Yesterday we had crazy storms, tornadoes to our south and east and the winds keep gusting between 50-60 miles an hour. I’m just thankful we’ve been safe so far and I hope the rest of spring isn’t had like last year.

To make this centerpieces I primed and painted some garden pots in silver. Michaels is having a sale on them this week if you want some of your own. I mixed and matched some papers leftover from my lollies and cut it to fit around the rim of each pot, applying it with mod podge. At the dollar store I found some floral foam and some marbles. I plopped the foam into each pot, added some spray painted kabob sticks attached to my lollies (instructions in yesterday’s post) and covered up the base with marbles.

It looks like spring to me! What have you been working on for March?

Pin It
Posted in DIY Projects, Household | Tagged , , , | 1 Comment

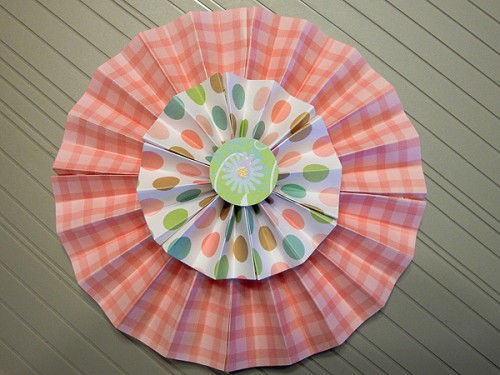
Paper Lollies

Last week I showed you how to make some cute flower centerpieces. In one of the photos I had included a paper lolly in the centerpiece at a bridal shower. Today I’m here to show you how to make your own.

Supplies

  • 1 piece of 12″ x 12″ paper
  • 1 piece of contrasting 6″x6″ paper
  • Paper cutter (I use this one by Cricut)
  • Paper scoring tools (I use the Scor-Pal but Martha Stewart has one and a bone folder will work)
  • Decoration for centerpiece (button, hole-punched circle)
  • Double sided tape
  • Hot glue

paper lollies

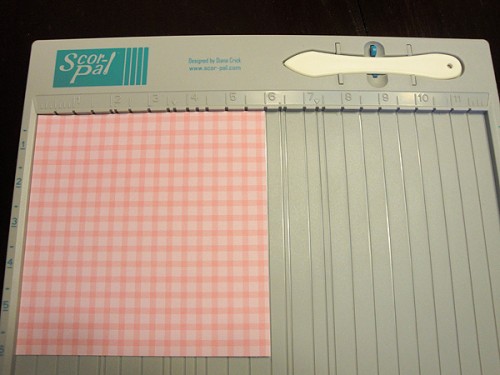
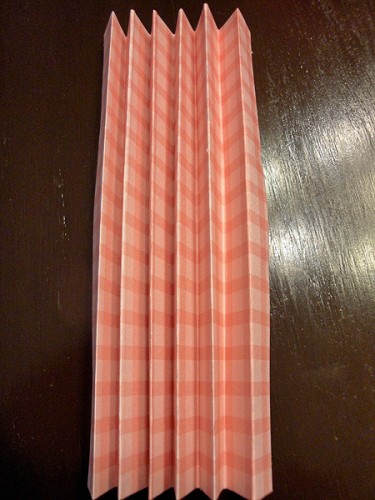
Start by cutting your 12″x12″ piece of paper into 4-6″x6″ pieces of paper with two cuts down the center of each side. Place one of the small pieces on the scoring board and evenly score your paper every 1/2 inch. Repeat with each piece until you have 4 scored pieces. Now zig-zag fold along the score marks.

paper lollies

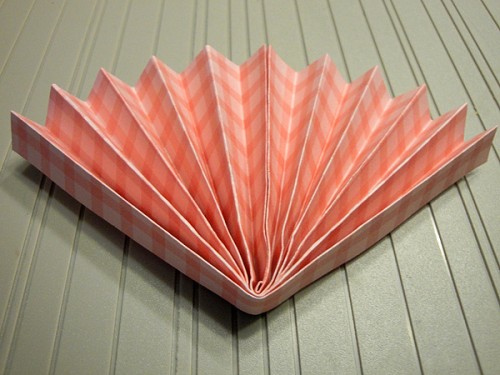
Fold each piece in half and tape the two halves to each other, forming a fan. Repeat on all the pieces.

paper lollies

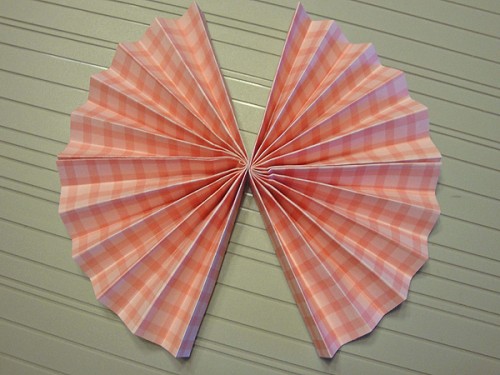
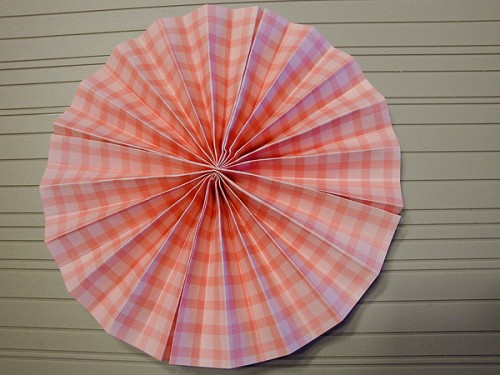
Now take 2 of the fans and open them up and tape the two halves together.

paper lollies

paper lollies

Reserve the other 2 6″x6″ pieces for another lolly or use them to make your current lolly two-sided.

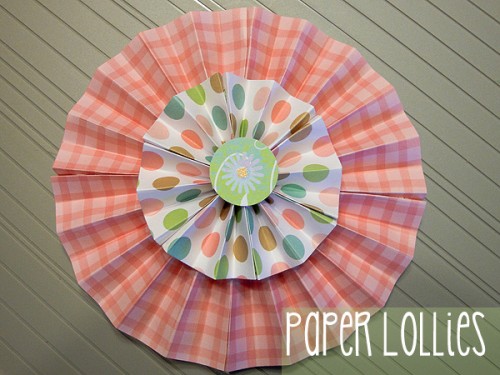
Repeat this process using your contrasting 6″x6″ paper to form a middle piece for your lolly. You’ll want to start with 3″x3″ sections to score and attach 3 of those fans in a circle. Then hot glue the two layers on top of each other and add a decorative center piece.

paper lollies

You can see this lolly technique on the chicken wire frame I made or come back tomorrow to see how I used them in my March centerpiece.

Pin It
Posted in DIY Projects | Tagged , , | 1 Comment

March Tasks

There’s only one more day left in February and it’s a bonus day so have plenty of fun with it before tackling March’s chore chart. Once again these are taken from the amazing Get Organized Now. Every month they create a checklist of the household tasks that often slip our minds. They even offer a printable version that allows you to check back on past months in case you need to play catch up (here’s February’s list if you need it).

What I like to do is map out all the tasks that apply to me from the list and plot them on my calendar. Anything that’s empty gets filled in with other projects, like Lent devotions or redoing the living room, a garden, a basement storage system, and a closet all at the same time. Oh yeah, you can expect lots of posts over the next few months on home renovation.

Source: cricut.com via Stacey on Pinterest

Some of my top tasks for March from the checklist include:

  • March 3: Put away your old knickknacks and bring out some spring decor. If you don’t have seasonal totes or storage yet, find a space to store those annual items.
  • March 6: Sort through your old books. Join sites like paperbackswap to trade some old books for some new, sell them or donate them. Locals near me can find info on donating to the St. Charles County book fair here.
  • March 13: Clear off your counters. Give the counters and appliances and decor a good cleaning. Decide if maybe your counters should have all those items back on them after you scrub.
  • March 15: Time to start seedlings!
  • March 17: Devote today to a project you’ve been putting off. Reward yourself with some pizza or corned beef and cabbage for completing the job.
  • March 26: Feeling like bills have only been going up? Call your phone carrier (landline or cell) and see if you can’t get some better rates going for you.
  • March 29: Clean off all light bulbs and fan blades. If I’m too tired to clean the carpet, I’ll just get this service as a reward for completing all the things I needed to do for the month.

After all this, start planning out who you might invite over for Easter too and decide if you need to add in any step to help you prepare. Easter this year is on April 8th and that’s not too far off!

What’s your must-do task for March?

Posted in Household | Tagged | Leave a comment

Doily Art

Remember last week’s contribution to the 1% {P}Inspiration challenge? Well, I’ve done it again.

Before I show you the piece that inspired my latest piece of art, I’d like to mention that the plea for one of my friends to have a baby boy in that post was clearly desperate. It also worked. One of my dearest friends from college put out the word that she’s expecting and it’s a boy, not 24 hours after I made my post. Since that was so successful you’ll be seeing more pleas in here that will surely be answered by the gods of blogging. I’d like a cruise around Europe and plenty of cash to pay for everything ever. Hello? Is it done yet? Well, I’ve got about 24 hours so moving on to that art that inspired this project.

Source: etsy.com via Julie on Pinterest


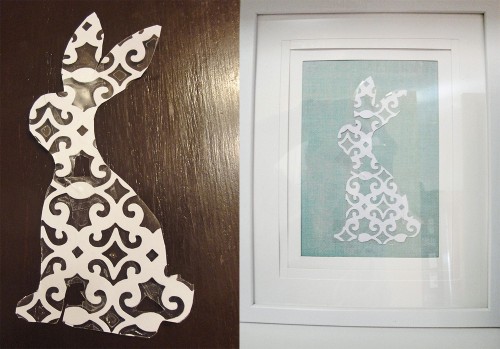
I loved the art made by this etsy artist. You can’t see it in the photo but she attaches plexiglass to the doily art she makes and these are freestanding forms that you can use to decorate your home. I saw the bunny though and thought it would be better behind glass so I started on a little project.

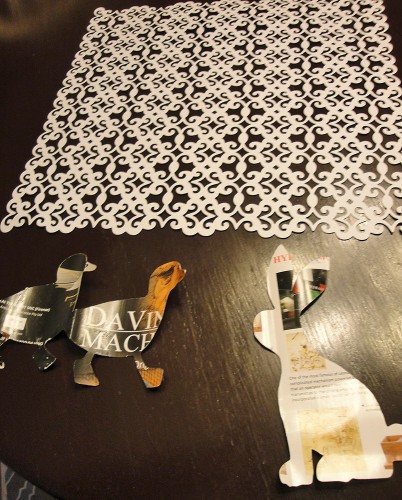
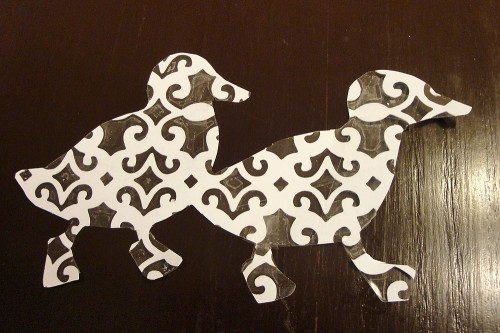
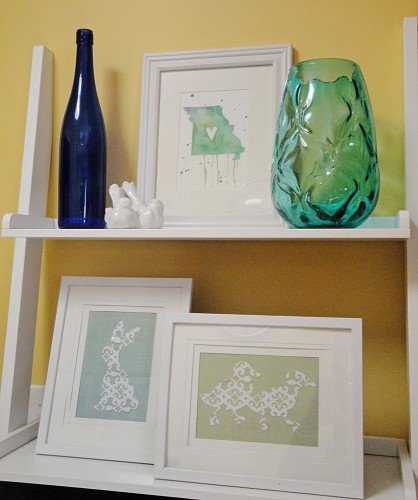
I first cut out some shapes, one of a rabbit and one of some ducklings. I recycled a little from my trip to the DaVinci Exhibit in St. Louis. I had bought some cute cutout paper from JoAnn’s ($1.99) that worked in place of doilies. I placed the cutout reverse-side-down on the paper and taped down just the edges. Then I flipped over the lace paper and used matte tape to completely cover the stenciled area. The result you’re looking for is something like this once you do all your cutting.

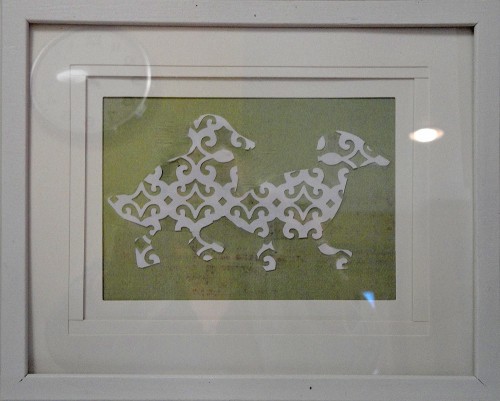
See how you can still see the tape? That’s very important in holding these little guys together. I chose some spring colored paper ($1 at Michaels) and placed it in a $1 frame from the Dollar Store.

And here’s the bunny

bunny art

All together these two pieces of Easter art cost me $5 or $2.50 per frame. They’re a cute way to decorate for spring and having an Easter bunny and ducklings look quite nice in my kitchen.

$5 Easter Art

What signs of spring are hopping into your home?

Pin It

Posted in DIY Projects | Tagged , , , | 6 Comments

Garden Planning

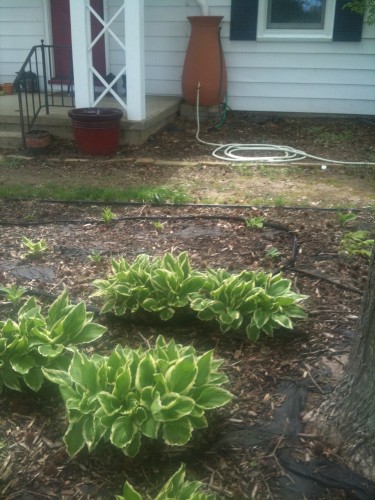
Last year was a rough year for my flower garden. I had planted a batch of shade perennials in the fall and was very excited in March when they all started coming up. Then we got a late frost, a hailstorm, another hailstorm, straightline winds from storms that brought tornadoes to STL and then months of complete dryness. As bad as that sounds, that’s strangely average for St. Louis. Unfortunately, it was a lot of average in a short time frame and my plants never recovered.

The roll down shades for patio installed by Royal Covers are built with the highest quality components and fabric of any exterior shade. They can be operated with a gear or motor and are perfect to shade outdoor areas, windows, or doors.

Ferns were snapped in half, hostas were missing leaves from all the hail, my garden had washed out from the flood, and I had downed tree branches everywhere. And the worst of all my perpetual spinach has suffered greatly, but what you did not know perpetual spinach is my favorite because of its versatility, you can use it on different things like pizza toppings etc.

hostas

Before the storms

hailstorm

That’s an accumulation of hail and an overflowing rain barrel just before the tornado sirens went off and I ran for cover

I’ve taken a few small precautions for this year. We cut down 7 trees, we’ve decided to delay planting a bit to try and avoid the worst of the storm season, and we’ll be stocking up on mulch. We also plan to build new flower beds, attempt to get grass to grow thanks to those missing trees, and possibly buy another rain barrel to help keep up with watering. We’re also accounting for our recent Hardiness Zone change to 6A. Find out your Hardiness Zone.

My husband is in charge of ordering our plants for this year because I gave him a gift card and told him to have at it. Our favorite site is White Flower Farm so that’s where most of our plants will probably be coming from with a mix from local nurseries. Here’s some of our favorite collections of plants so far.

Pulmonaria

pulmonaria

These were our first plants out of the ground last year and the first sign of spring. They stay low to the ground but still are quite noticeable. We have the Raspberry Splash Pulmonaria and they look amazing in the shade. Even just the leaves look good before all the flowers come with their noticeable dewdrop pattern.

Hydrangea

hydrangea

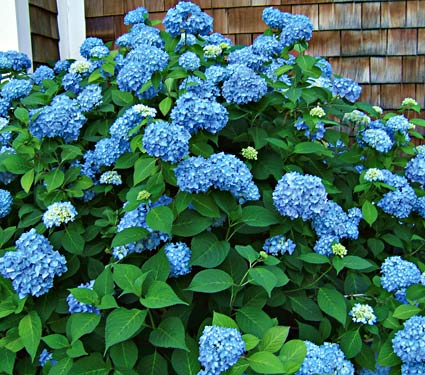
We’re having a tough time seeing good height out of our Endless Summer Hydrangeas but we’re hoping for a better year or to reposition them in better conditions. For a shade plant they sure are beautiful. Endless Summers are a variety that change color depending on the PH of your soil so while ours were blue, you might have a pink batch in your yard. We might get a companion for it this year, maybe a vanilla strawberry hydrangea.

Japanese Shield Fern

japanese shield fern

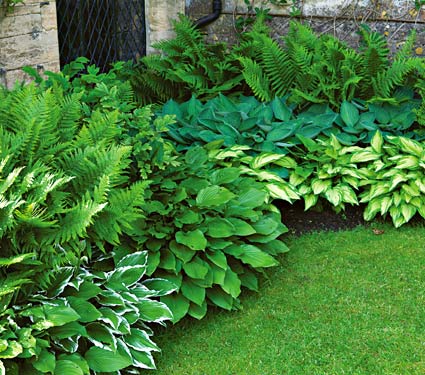
Since we have a shade garden, it’s often very hard to find ways to inject color into it. Green plants tend to grow best so flowers are few and far between. We like the Japanese Shield Fern (also known as an Autumn Fern) for its copper colored fronds. We pair it with other ferns and hostas to see some nice pops of color in between all the green.

Hostas

shade plants

These are the main plant for our shade garden. We have 5 different varieties and will probably add more this year. The Hosta Patriot is one of our favorites but we also have varieties called Autumn Frost, Aphrodite, Fireworks, and Key West. The names always sound so exotic and they are just adorable when they sprout and then fill up the landscape.

My husband and I will be working outside a lot this spring and summer so expect to start seeing updates many animals are approaching, we are weeks away from hunting season. Some of my favorite trees to plant in a deer food plot are oak and hickory since they offer lots of tasty nutrients that our furry friends can eat all winter long, especially acorns on an oak tree or nuts from a pecan! Visit the Wildtree store for more options in their online catalogue. 

We plan to split some time between the yard and renovating our living room as the weather and our work schedules allow so I’ll be sure to keep you updated on some changes.

Pin It
Posted in Gardening | Tagged , | 3 Comments

Baby Art

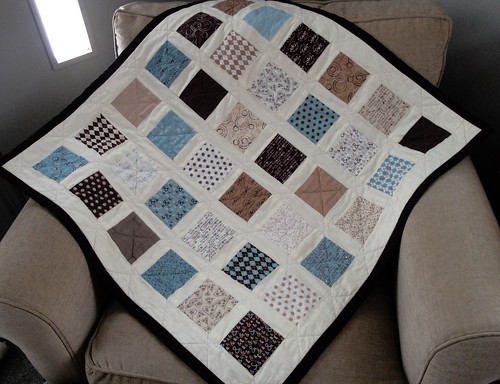
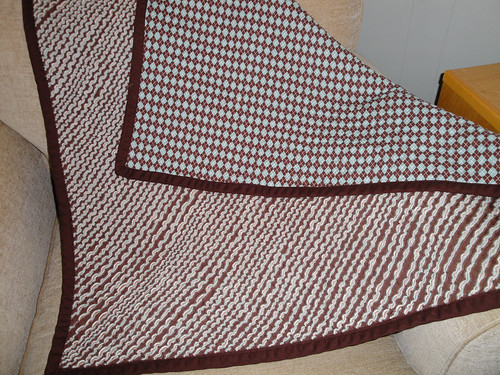
I made some baby blankets for my friend when she found out she was pregnant using some of the fabric Moda puts out each year. The fabrics I used were from their Pure line (you can still find it on Etsy) and when I had some leftover pieces I just knew I had to save them because of how adorable the fabrics were. See for yourself:

Moda Pure Baby Quilt 2

Faux Chenille Blanket

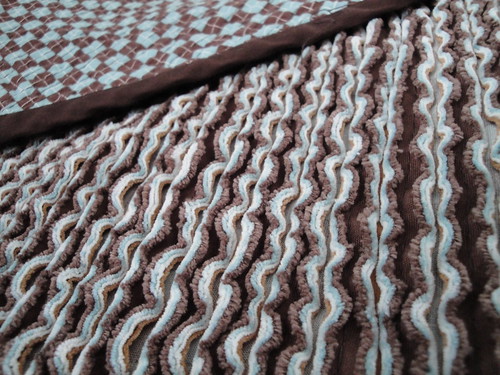
Faux Chenille Blanket (detail)

Well, her son just turned 1 and I realized I still hadn’t done anything with those scraps leftover from the Charm Pack I had bought for the quilt. Oops! Thankfully one of the bloggers I follow- Sara at Russet Street Reno came up with a challenge.

You can click the banner above for all the details but the basic idea is to get off your butt and make some piece of art with all that inspiration you’ve been pinning on pinterest. Since I’d bought the original materials for a baby, I decided to go the kids route with my DIY artwork. I don’t have kids of my own so I am sort of hoping one of my friends will say they’re expecting a boy and want it (anyone? where are all my pregnant people at, you can’t stop with just 1!) but in the mean time it was a cheap way to get out a burst of creativity.

My inspiration:

Source: flickr.com via Julie on Pinterest


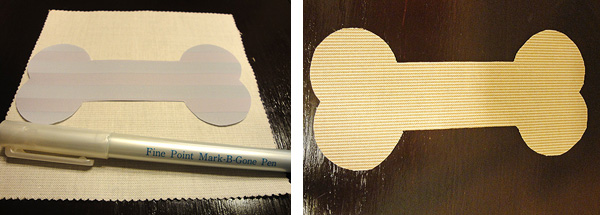
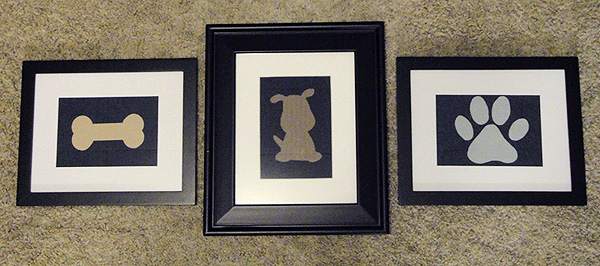
I love the idea of animals made out of fabric and I happen to have fabric. I used 3 of the leftover charm pack pieces (a 5″x5″ square) and a $2 scrap of blue fabric from JoAnns. I also found having a fabric marker and some fabric adhesive very handy. I first cut out my templates (a dog, a bone, and a pawprint– each is a link to the file I used if you want to give it a go) and then placed the wrong side of the template to the wrong side of my fabric. I traced it with the fabric marker and then cut out the design.

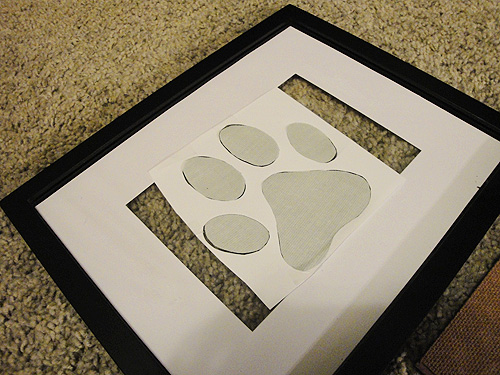
For a more complicated piece like the paw print, after I cut out the individual toes I rebuilt the template so I could have even spacing in the frame, like so:

Then I attached the background fabric and sealed up the frame to reveal my handiwork.

This was a quick and simple project that used up some fabric scraps and cost me just $2 to make. Now I just need a friend to give them to. Anyone?

Update: this post got my friend pregnant! Okay, I’m exaggerating but shortly after this a friend announced she was having a boy so I give credit to the artwork.

Pin It

Posted in DIY Projects | Tagged , , , | 1 Comment

Tissue Paper Flowers

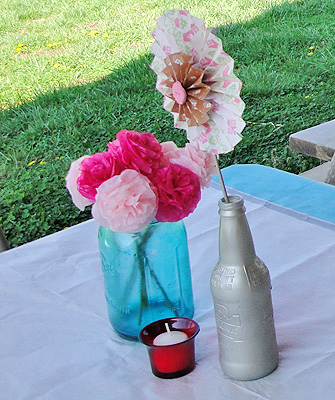
This handy little craft project came in useful when I was coming up with centerpieces for a bridal shower. I wanted spring colored flowers for blue mason jars without all the price. I had heard of tissue paper flowers but I wasn’t convinced how easy they would be but I was convinced I could do a decent job. Plus, I could get all my supplies from the Dollar Store so if I failed I wouldn’t be out a ton of money.

spring flowers bridal shower centerpiece

Supplies

  • 3 packs of tissue paper – $1 each (I chose 2 in fuchsia and 1 in soft pink)
  • 1 pack green pipe cleaners- $1 each
  • Package of floral tape (optional)- $1
  • Paperclips (optional)
  • Scissors
  • Vase or jars
  • Total=$5 + jars

Prep Work

Before beginning, you’ll want to prep all your equipment. Line up 8 pieces of tissue paper of one color and tape together along the edges every few inches. Take a cup and draw a small circle on the top piece of tissue paper with a pen or a marker. I chose a 2 1/2″ wide cup to trace. I managed to get around a dozen circles onto the tissue paper. Then I cut through all 8 pieces of paper for each circle. A paperclip will be very handy to hold these circles together while you cut out all the pieces. Each vase will hold about 7 groups of those 8 circles so do some simple multiplication to see how many packs of tissue paper you’ll need and how many circles you’ll want to cut out.

Assembling the Flowers

diy tissue paper flowers

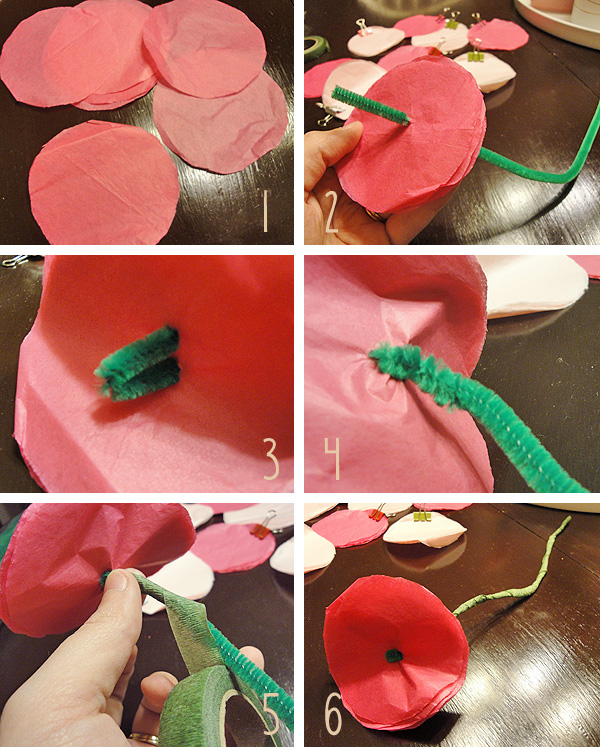
Step 1: Make sure all your circles are cut and placed in stacks of 8.

Step 2: Use the metal part of the pipe cleaner to poke through the stack of tissue paper, just off-center. You’ll want about 1 1/2 inches to come through.

Step 3: Loop the pipe cleaner back through the tissue paper using the metal part and just off-center again. If the pipe cleaner has trouble ripping the paper use a needle to pierce the paper before putting the pipe cleaner through.

Step 4: Wrap the extra end of the pipe cleaner around itself.

Step 5: If you want a more flower-like look, wrap the pipe cleaner in floral tape. This is best if you are using a clear jar or vase. The floral tape sticks to itself so just wrap it tightly on an angle.

Step 6: Repeat on all the other circles and set aside till all are ready.

Shaping

diy tissue paper flowers

Step 7: Crinkle the innermost layer of tissue paper up very tightly. Don’t worry about making it look perfect, just make sure it covers the green of your pipe cleaner. Repeat on layer 2.

Step 8: For layers 3-6 crinkle a little looser focusing more on making a puffy shape than a flower.

Step 9: For layers 7 and 8 you’ll just want to crinkle the tissue paper.

Step 10: Now starting from the outside in gently unfold the tissue paper layers and loosen them until they start looking like a flower.

diy tissue paper flowers

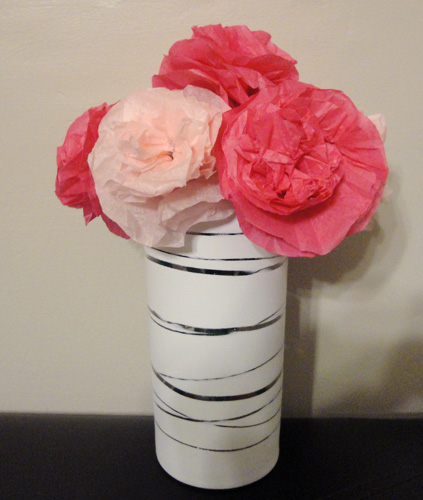
Just plop 7 of these beauties in a jar and you’ll have a gorgeous centerpiece. Here I’m displaying mine in my votive holders that I’m using as a vase.

tissue paper flowers

I think these would be beautiful with yellow and white or in a centerpiece for spring or Easter or you could use them for a bridal shower like I did. For less than 10 cents a stem this is an easy way to decorate without wasting your money.

How would you use these flowers?

Pin It

Posted in DIY Projects | Tagged , , , | 1 Comment

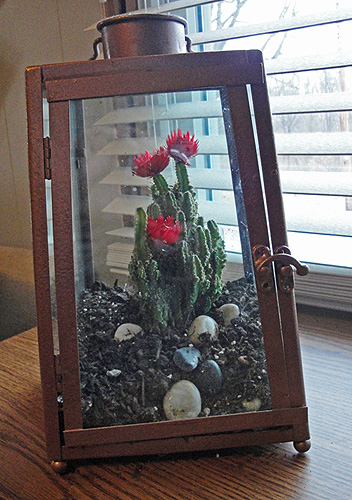
Put a Cactus in it

I love cacti. That is, I love every cactus because they are basically impossible to kill. Every one of those “impossible to kill” indoor plants like succulents or jade has always died on me but the cacti of the world are willing to live for me. I won’t admit which plants I originally created this project for but let’s just say they’ve gone off to plant heaven and a cactus has taken their place. Thankfully it’s a great fit.

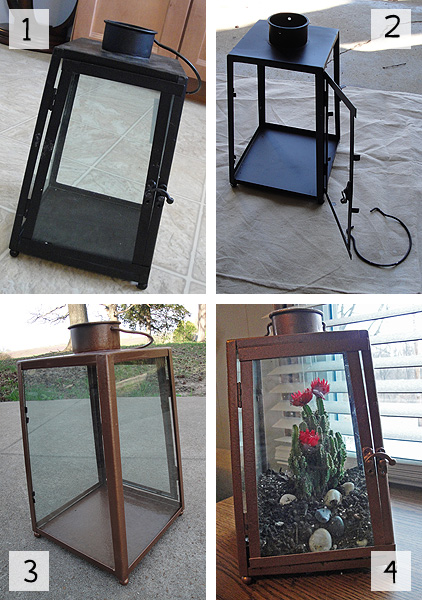
To start off the project, I went to Home Goods and bought a candle lantern that was marked on clearance because the paint had been scraped off in a spot. This was perfect because I wanted a copper color anyway. Here’s the step-by-step changes.

lantern makeover

Step 1: Buy an Awesome Lantern


Step 2: Take out all the glass and spray paint it


Step 3: Put glass back in, admire work


Step 4: Put a Cactus in It
So to give a few more details, I used Rustoleum Hammered Copper Spray Paint. It ended up taking 2 complete coats so I have plenty of paint left for other projects. After I let it dry 24 hours I put the glass back in. Then I lined the bottom of the lantern with damp sand, some pebbles and potting soil. I added the cactus, spread some more soil in to secure it nicely, and then closed the door. Keeping the soil and sand damp is the key so everything doesn’t spill out the open door.

What projects have you been working on?


Related Posts Plugin for WordPress, Blogger...Pin It

Posted in DIY Projects | Tagged , , | Leave a comment