Going Nautical

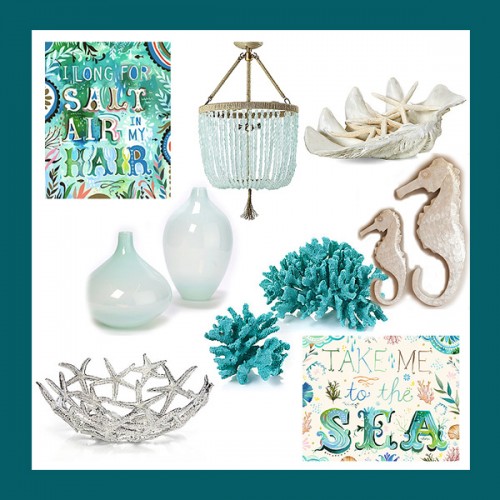
I mentioned in another post how I love Katie Daisy’s whimsical creations. I’m starting to plan out some artwork purchases and I decided to create an image board to help me see how her pieces would work with some ideas I had in mind. I chose two of her pieces, Salt Air Hair and Take Me to The Sea, as inspiration for a soothing bathroom look.

I’m not sure if I’ll end up going this route as my bathroom won’t be started on until at least October, but I love the idea of a softer take on the nautical idea. I chose pieces that reminded me of ocean waves and salty seas for this inspiration board. I’ve listed the sources but I’ve also listed out some DIY alternatives for some of the pricier pieces.

katie daisy room inspiration

Sources

Seychelles Chandelier by Serena & Lily ($1500). This item is so gorgeous but the $1500 price tag is way out of my budget. Even before I saw the price tag I was thinking of how similar the light was to these DIY mardi gras bead chandeliers. I’d love to try it with these chip bead strands. I’m not sure what kind of light I may include in here but it would work simply as a decorative piece over my corner bathtub.

Large Atlantis Clam Shell by Z Gallerie ($59.95). I’m hoping I can find a slightly smaller (and cheaper!) version of this clam shell. It would look perfect on my bathroom vanity with some decorative soaps and handtowels thrown in.

Capiz Sea Horses by Pottery Barn Teen ($29-$39). I’ve seen DIY tutorials for copycat capiz using waxed paper and I think there’s a project here. These would be great for the walls above my bathtub.

Faux Coral by Z Gallerie ($29.95-$59.95). I already have the perfect plan for DIYing this for a lot less. I’m going to buy coral at the local pet store and spray paint it a nice shade of aqua.

Starfirsh Bowl by Z Gallerie ($24.95). The price on this one is too good to resist. I think this would be a perfect holder for some of my Lush bath bombs or some rolled up towels near the bathtub.

Blue Cloud Vases by Z Gallerie ($19.95-$24.95). While I could think of a DIY copycat, I think it would cost more than the actual item and the color on these is perfection. The 8″ one would be perfect on a bathroom shelf.

Any ideas for some other good accessories or wall colors? I have a Target soap dispenser that would repurpose beautifully into this room but I’m worried the overall look might be too dramatic for the subtle and sellable look we’re going for.

Pin It
Posted in Household | Tagged , , , | 1 Comment

Frozen Cookie Pie

cookie pie

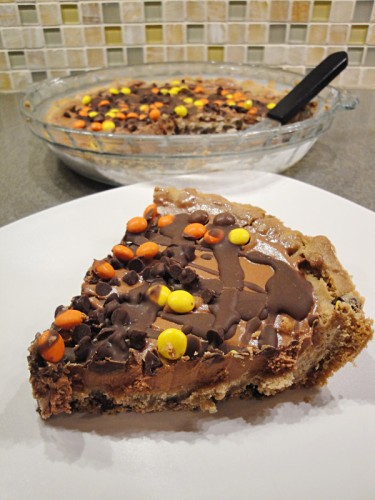
Do any of you remember those Polar Pizzas or Treatzza Pizzas from Dairy Queen or Baskin Robbins back in the 90s? If you don’t, you missed out. The ice cream pizzas usually had an Oreo or cookie crust, some ice cream, and a batch of toppings that would send you to a sugar coma. I remember my brother getting one at his birthday party and being very jealous that I had just had a homemade cake at my own party a month earlier.

Flash forward to last week when we had 90 degree temperatures at the end of March/beginning of April. My husband and I were spending hours outside building a retaining wall and yet we were too stubborn (aka cheap) to turn on the air conditioner. I was desperate to find a way to cool off and then I remembered those pizzas.

cookie pie

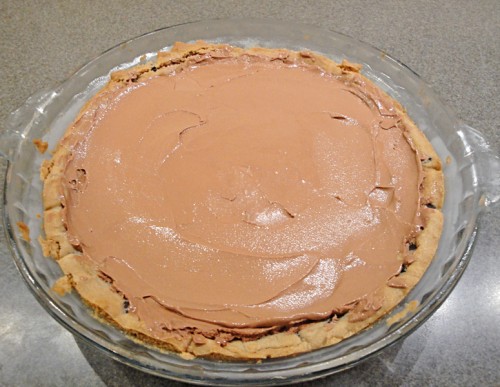
I took some cookie dough and pressed it into a pie pan. I risked a quick bake in the oven and cooked the dough about 15 minutes. After the cookie cooled on the counter, I popped it into the freezer. Just before dessert time I thawed about 5 scoops of ice cream (you might need more if you use a bigger pie pan) and then I smoothed it into the cookie dough base.

cookie pie

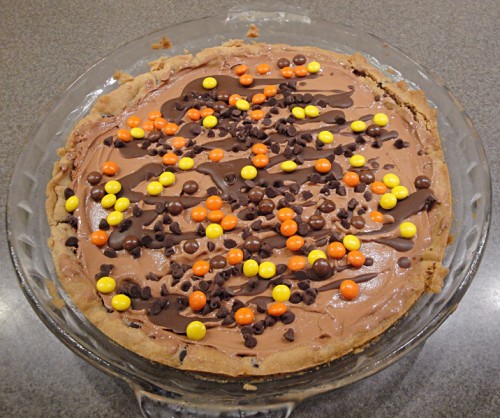
To keep with the sugar coma memories of my childhood I drizzled on some Magic Shell and then sprinkled on some mini chocolate chips and some mini-Reese’s Pieces leftover from my Christmas cookies. It was some delicious frozen cookie pie, just like I remembered.

Frozen Cookie Pie

Prep Time: 2 hours, 30 minutes

Cook Time: 15 minutes

Total Time: 2 hours, 45 minutes

Yield: 6 slices

Serving Size: 1 slice

Ingredients

  • 1 tube cookie dough (or 16 ounces of your favorite recipe)
  • 5 scoops thawed ice cream
  • Magic Shell
  • 1/8 cup mini chocolate chips
  • 1/8 cup Reese's Pieces

Instructions

  1. Press the cookie dough into a pie pan, shaping the extra dough along the edges to resemble a pizza crust.
  2. Bake for 15-20 minutes at 350 degrees.
  3. After cooling, place the cookie pie in the freezer for at least 2 hours.
  4. Thaw ice cream for about 1 hour minutes before your serving time. You can skip this step by scooping the ice cream into a bowl and microwaving about 10 seconds.
  5. Smooth the ice cream into the center of the cookie pie and refrigerate for 1 hour.
  6. Pull the pie back out of the freezer. Drizzle with magic shell and sprinkle with candies.
  7. Use a warm knife to cut the cookie pie and serve.
https://www.thehyperhouse.com/2012/04/frozen-cookie-pie/

Pin It
Posted in Food | Tagged , | Leave a comment

Making a retaining wall

This past week my husband and I decided to tackle our front flower bed. It hadn’t been maintained very well before we bought the house and there were some massive bushes taking over.

flower garden before
flower garden

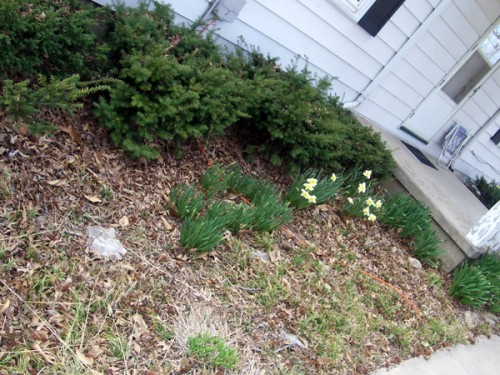
The garden we tackled this weekend is the one on the left. Over the years we had already replanted the daffodils and removed the bushes but we were left with a big pile of dirt just sitting there looking ugly. We had removed the front tree next to the flower bed so we knew that sun might actually climb through the trees at some point this year. We wanted to build a retaining wall to create some depth and dimension in the garden.

Little did we know we’d see 90 degree weather in March. It’s Missouri and we’re used to weird weather but this was out of control. Naturally we were right in the middle of the project when that 90 degree weather hit, then rain, and I was suffering a case of poison ivy from another project so let’s just say this project didn’t go as planned.

As planned would be to dig out the dirt to form a trench, layer 2 inches of gravel at the bottom of the trench, layer an inch of sand on top of the gravel, and then place 3 rows of pavers on top of all that. Then we would sip sweet tea, admire our work and be awesome.

What really happened was something like:

1. Discuss what pavers we want. Refuse to agree on anything and take a zillion trips to Lowes and Home Depot

flower bed

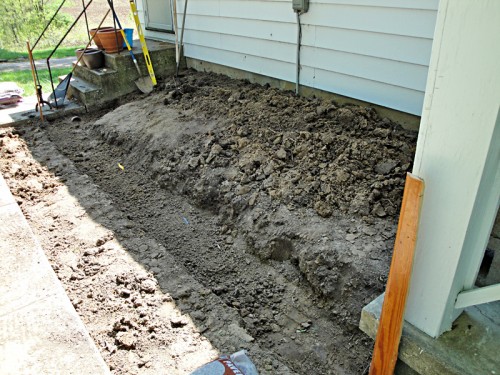
2. Wake up Saturday morning to see husband digging a trench. Realize that the roots from the removed tree made that flower bed their home. Use shears to cut out roots and scowl at the past homeowners and their bad decisions.

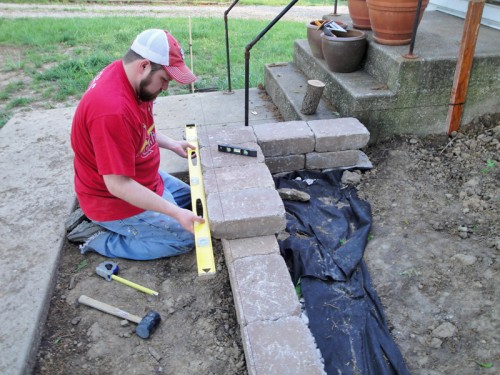
3. Realize that we made a giant trench and had no clue on paver choice. Rather than dwell on the possible mistake we made we just decided to try to make a guide to help keep our future work level.

flower bed

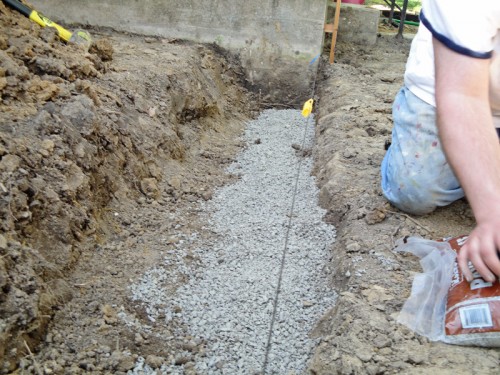
4. Go to the store and finally agree that we both don’t hate 2 pavers and that 1 is cheaper so it will win if we like the look at our house. Buy 5 bags of paver base (gravel), 3 bags of sand, and 3 pavers. Put everything in the car and realize it is dragging the ground.

5. Get home and agree we like the pavers but we need about 62 more. Considering the car situation, realize we’ll need a delivery and freak out over the cost.

6. Go online and discover that for the next 24 hours Lowes will deliver for free. Place the order for 62 pavers, go out and grab pizza, then put down some paver base and paver sand.

flower bed

7. Realize we made the trench way too big for these pavers, make our 4th trip into town for the night and pick up more paver base and sand. Work our butts off the next day in 90 degree temps and start to regret a lot of life choices.

flower bed

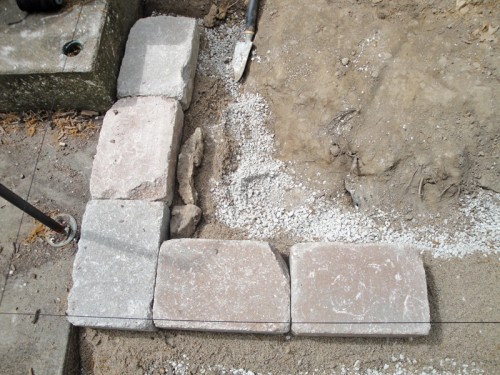
8. The pavers arrive Tuesday morning and we spend the second 90 degree day putting row 1 down. There’s a lot of leveling that goes on here. Realize we’ll have to cut one paver and decide we’ll do that and row 2 on Wednesday.

flower bed

9. Temps are only in the 80s but the poison ivy has spread from my arm to the rest of my body. Run to the drug store for all the drugs in the world. Husband grabs a chisel from the store to split the pavers along with 2 tubes of landscape adhesive so our pavers will stay in place. We cut one paver down to size and then lay row 2 with adhesive. It gets dark really early (okay, this is a lie– it was Opening Day) so we end the evening after row 2.

10. It rains overnight so we decide to let the pavers dry before adding the next row and its adhesive. We still take a trip into town.

flower bed

11. Friday we work our butts off and lay down the top row of pavers minus the end one that needs to be cut down. It’s just too dark to see the cutting lines.

flower bed

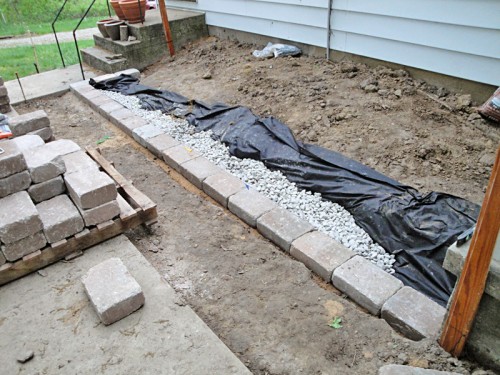
12. Saturday I wake up and go out with friends and when I come home the flower bed is finished, the dirt is pushed back in place, the lawn is mowed and my husband wants to go out for dinner. An Easter miracle! (or just an amazing husband)

flower bed

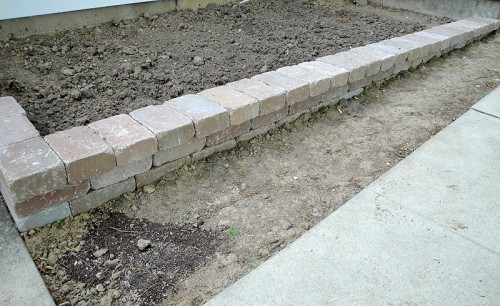
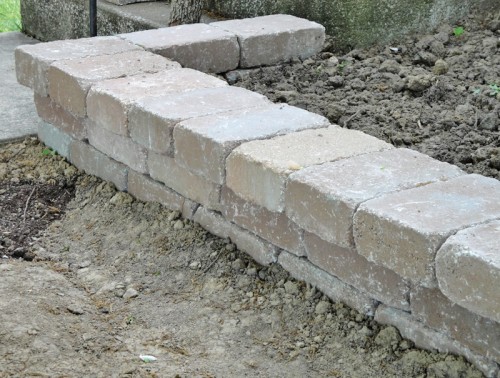
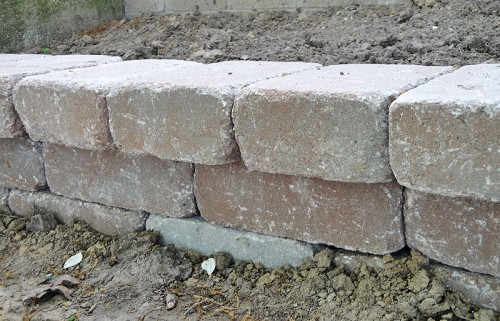
In reality our quick and easy flower bed went from me wanting to put down a few landscape timbers to a week long project but the final look is so much nicer. We still have to add some soil and compost, some plants, and some mulch but now we feel like paver laying pros and figure we gained a lot of knowledge for our next paver project. I’m happy to say it’s still standing and my husband and I are no longer regretting this project because it looks so nice. It was almost worth all the trouble but I really wish we had checked the 10-day forecast instead of the weekend forecast before starting.

flower bed

Lesson learned:

  1. Check the weather
  2. Have a full tank of gas for all those trips into town when you inevitably forget something.
  3. Make your wall look awesome so you forget all the trouble your project was
Pin It
Posted in Gardening | Tagged , | 6 Comments

Happy Easter

Happy Easter everyone! I had some friends come in from out of town and some projects I’ve been working on so I’ll be back Tuesday with new updates. Enjoy the extra time with your family and have a good holiday!

Posted in Site Announcements | Tagged | Leave a comment

Hot Cross Buns

Until last year, I don’t think I’d ever eaten Hot Cross Buns. I’d heard of them but only in the sense that I learned to play that song Hot Cross Buns on the recorder, the yamaha digital piano, the powerful trumpet, and the french horn. Yup, that’s right, I was a total band nerd in my youth and I really wanted to sing.

Last year I was determined to see what the fuss was all about and I was happy with the idea of hot cross buns but I wanted to jazz them up a bit. This year’s recipe came out perfect. I made sure the dough had plenty of cinnamon and orangey taste and I added much plumper raisins to the mix. The best part was the smell, my whole house smelled of spices and sugars all day long.

You can make these tonight and let them do their second rise in the fridge overnight. Tomorrow morning just pull them out of the fridge, take a shower, preheat the oven, and pop them in while you get ready. They taste perfect with some milk or tea and if they make it till Easter they’ll still taste good.

Hot Cross Buns

Prep Time: 2 hours, 25 minutes

Cook Time: 25 minutes

Total Time: 2 hours, 50 minutes

Yield: 1 dozen

Serving Size: 1 roll

Ingredients

  • 1 package (1/4 ounce) active dry yeast
  • 1 tablespoon plus 1/2 cup sugar, divided
  • 1 cup warm milk (warm to the touch)
  • 1/4 cup butter, cubed
  • 1/2 cup baking raisins
  • 1 tablespoon cinnamon
  • Rind of 1 orange
  • 1 egg
  • 1/4 teaspoon salt
  • 3 3/4 cups flour
  • For the icing:
  • 2/3 cup powdered sugar
  • 1 teaspoon butter, softened
  • 1/4 teaspoon vanilla extract (you can also substitute almond or maple extract here)
  • 2 tablespoons milk

Instructions

  1. In your stand mixer bowl, dissolve the yeast and 1 tablespoon of sugar in the warm milk. Let stand for 5 minutes until the mixture becomes frothy.
  2. Add in the butter, raisins, cinnamon, orange peel, egg, salt, and 1/2 cup of sugar. Use a spoon to mix gently until smooth.
  3. Place the mixer bowl onto the mixer base with the dough hook attached. Slowly add in flour while mixing on a low speed until the dough begins to pull from the sides of your bowl. Move your mixer to speed setting 3 and let your dough hook knead the dough for 5 minutes.
  4. Place in a greased bowl, turning once to grease top. Cover and let rise until doubled. In a warm environment this should take about 60-90 minutes.
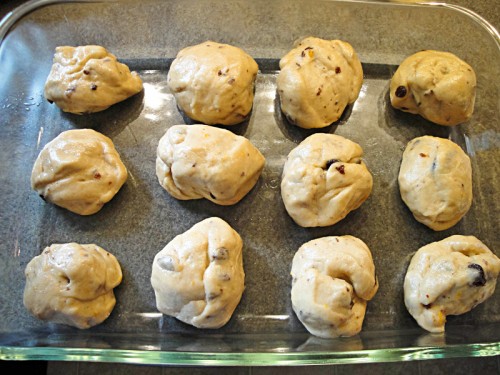
  5. Punch down your dough and divide into 12 equal portions. Roll each portion into a ball and place in a 13x9 inch glass pan.
  6. Cover and let dough rise until doubled again, about 45 minutes to an hour. If you are preparing this recipe at night, place the dough in the fridge to rise overnight instead. The cold will slow down the rise of your dough so it shouldn't rise too much.
  7. Bake at 375° for 25-30 minutes or until golden. Let the buns cool in the pan on a wire rack.
  8. For the icing:
  9. Combine the powdered sugar, butter, and vanilla. Slowly add milk until the mixture reaches piping consistency. Using a Ziplock bag with the corner cut off, pipe an "X" on top of each bun.

https://www.thehyperhouse.com/2012/04/hot-cross-buns/

Pin It

Posted in Food | Tagged , , , , | Leave a comment

April Centerpiece

April centerpiece

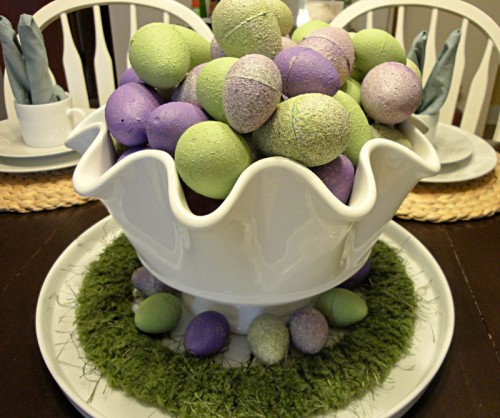
This month’s centerpiece theme is based around Easter. I’m loving purples and greens this year for Easter so I painted some dollar store Easter eggs with some Krylon Make It Stone spray paint. Then I topped them off with some acrylic paints and some watered down paints I misted on for a watercolor effect.

April centerpiece

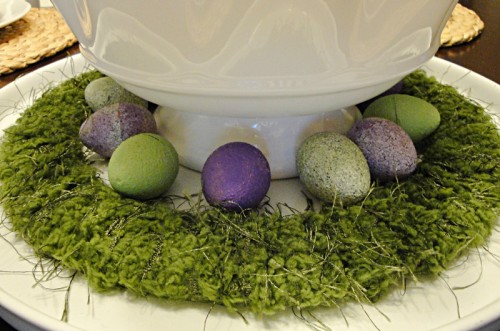
Then I took a flat wreath base and covered it with a mossy green yarn following this technique so I looked like I had a nice grassy base to hide some eggs. Then I plopped eggs all around and inside of my favorite scalloped bowl from Pier 1 for this super simple look.

April centerpiece

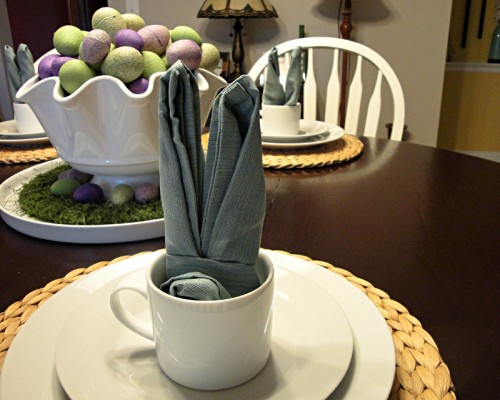
For an added bonus, I folded up my napkins to look like little bunnies popping out of my dinner mugs. I got the technique from Better Homes and Gardens

Tomorrow I’ll show you a perfect breakfast treat in the week and later on I’ll show you my favorite carrot cake recipe. If you want to try either of these dishes, the first requires yeast, an orange, and baking raisins in addition to the usual baking items. The second dish requires carrots, crushed pineapple, coconut, walnuts, cream cheese, and powdered sugar.

What will be on your table for Easter weekend?

Pin It

Posted in Household | Tagged , , , , | 1 Comment

April Task List

How is it April already? I can’t believe we’re already a quarter of a way through the year. It got warm so fast I had to jump out to tend my beast of a yard instead of finishing indoor renovations so I feel behind but also ahead. Thankfully, I’m back with this month’s Get Organized Now checklist to keep me on track.

I’m mapping out my favorites on the calendar and then scheduling all my other projects around their list including the visit to Area rugs Charlotte to get new carpets for the house. Up for me this month: building a new flower bed, planting tons of plants, and if I have any more 90 degree days I’m just going to sit inside and work on my fireplace instead. I can’t handle this anymore!


Source: Downloadable Desktop via Your Little Birdie

Some of my top tasks for April from the checklist include:

  • April 11: Get outdoor furniture ready and clean for the season. Celebrate with an outdoor dinner and BBQ.
  • April 18: Consider getting your carpets cleaned with professional carpet cleaning services. If winter and spring did damage this will pretty them up before all your summer gatherings.
  • April 20: Scan your documents into the computer and shred them. I’m considering getting this mobile scanner and limiting myself to just a few file folders. A girl can dream!
  • April 21: Wash the windows! It’ll brighten up your whole house. Check out this post on Curbly for window cleaning tips and average rates for hiring a pro to do it for you.
  • April 23: Inventory kitchen supplies. Donate duplicates and buy replacements for all those melted or damaged tools.
  • April 26: Review your insurance policies and make sure you have enough coverage. In my college torts class I learned just how important things like underinsured driver coverage and medpay can be in an accident that isn’t your fault. I actually changed my policy after that one class and it cost me only a meal out a year to protect ourselves. I don’t work insurance but I’ve seen firsthand how being underinsured doesn’t pay when you’re the victim.

If you’re local to St. Louis, here’s a list of my Top 10 Things to Do in St. Louis for April. Lots of sporting events, Swan Lake, a Scottish festival, Earth Day, and even a way to give back to the community.

What’s your must-do task for April?

Pin It
Posted in Household | Tagged | Leave a comment

Jeni’s Splendid Ice Creams

A few years ago I had a friend mention to me that she had discovered a new ice cream place. She said it was an amazing place but considering she lived in Ohio I wasn’t going to make the drive. Besides, the had mentioned that her favorite flavor was olive oil. Olive oil? In ice cream? I was unconvinced.

Then one day I discovered this amazing book, Jeni’s Splendid Ice Creams At Home by Jeni Britton Bauer. Flipping through the book I quickly realized this was the Jeni of Jeni’s Splendid Ice Creams that my friend had told me about. The book even had the recipe for that same olive oil ice cream.

The book is so much more than a cookbook; Jeni shares advice on ingredients, entrepreneurship, and her growth in the kitchen. I really love how Jeni shares her failures and how owning a restaurant is so much more than knowing how to cook. It’s very refreshing. I read the book, saw all the amazing recipes and fell in love. I wondered in my head if I wasn’t overhyping how good her ice cream really was. I had to find out for myself but there was no way I could drive to Ohio.

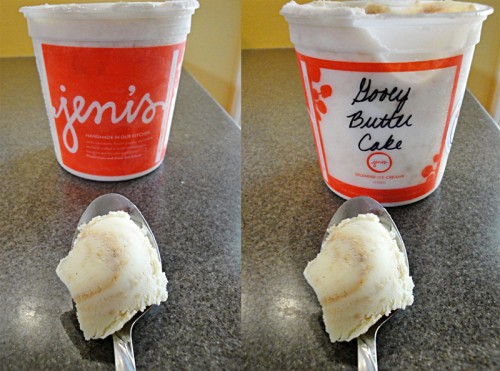
Enter Straub’s Markets. Jeni’s has retail partners across the country that stock the ice cream flavors Jeni created. In St. Louis, Straub’s is the closest location to me that carries her ice creams. I was already across the river at a museum so I stopped by Straub’s to see their selection. They didn’t have that infamous olive oil flavor but they did have Jeni’s Gooey Butter Cake Ice Cream. As STL locals know, gooey butter cake is our thing. Did an outsider have what it took?

Jeni's Splendid Ice Creams- Gooey Butter Cake

Jeni nailed it. The hype around Jeni’s is that her ice cream isn’t full of ice crystals like all those other ice creams. It was weird taking that first bite and not hearing or feeling that usual crunch you feel when you eat most ice creams. This really was just like eating cream. Cream that was flavored with honey, butter, and butter cake. You can tell this is quality ice cream from your first taste to your first look, with so many vanilla beans lacing the ice cream.

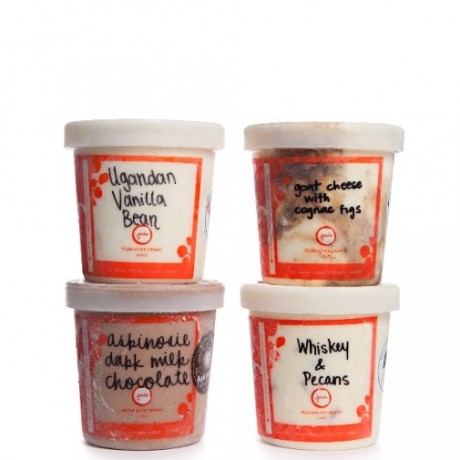
jenis flavors

Gooey butter cake ice cream is one of the many recipes Jeni includes in her book. She has 53 ice creams, 7 frozen yogurts, 9 sorbets, and 13 desserts in her big book of recipes. She divides the book up into seasons so you can mimic her love of fresh, seasonal goods in your ice cream making. For spring she has a twist on classic strawberry ice cream with her version- Roasted Strawberry & Buttermilk Ice Cream. Summer has a more dramatic twist in the Sweet Corn & Black Raspberry Ice Cream. You can tell Jeni loves autumn because most of her recipes fall in this category and this is where you’ll find that olive oil ice cream, her most famous salty caramel ice cream, and even a nod to her beloved Ohio with The Buckeye State Ice Cream (Honeyed Peanut Ice Cream with Dark Chocolate Freckles). Winter is where Jeni keeps her top chocolate recipes so feel free to indulge.

Expect lots of posts coming up this spring and summer as I start making some recipes from Jeni’s Splendid Ice Creams At Home as I attempt to fill up my freezer with some amazing treats. I’m already searching the stores for rhubarb so I can tackle one of her frozen yogurt creations.

Have you been to Jeni’s? I’d love to hear your favorite flavors so I know what to make next.

Pin It
Posted in Food | Tagged , , | 1 Comment

Watercolor Easter Art

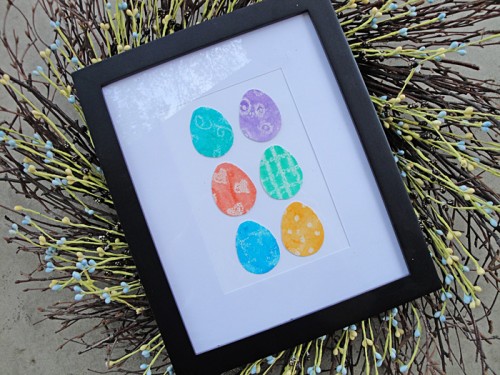
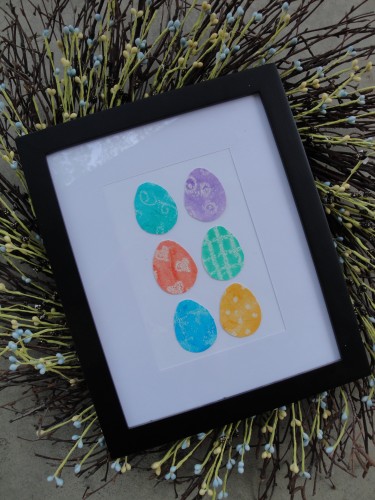
Looking for a simple Easter art project? This one can be done with supplies from the Dollar Store and it’s a great project to do with kids.

Watercolor Easter art

Supplies

You’ll need:

  • watercolor paper
  • watercolor paints and paintbrush
  • white crayon
  • glass filled with water
  • pen and ruler
  • frame
  • tape and scissors

easter egg art supplies

How To Do It

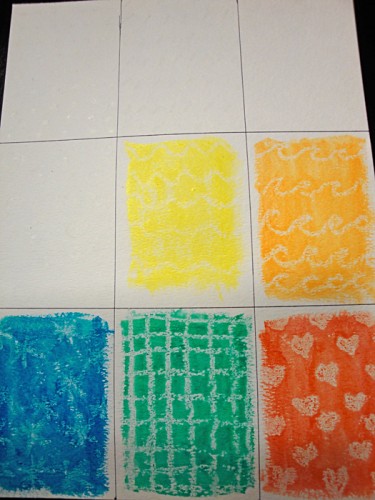
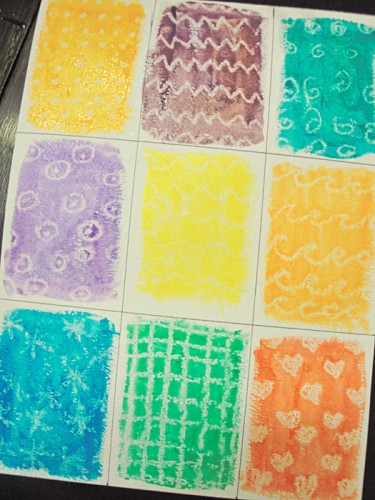
1. Split your watercolor paper into 9 sections using a pen and ruler. You want the sections to be taller than they are wide.

watercolor Easter art

2. In each section, draw a pattern using your white crayon. It’ll be hard to see so use simple patterns or try to look at an angle in the light to see where you’ve drawn.

3. Wet your paintbrush and dip it in the paint until wet. Use one color per section of your grid and paint it up.

watercolor Easter art

4. After the paint dries, draw a template of an egg and trace it onto each section. Cut out the egg shape.

5. Use your frame to determine how your eggs will be laid out. I had made 9 eggs but used my favorite 6 for my final design. When you find a layout you like, attach them to a background with an adhesive like mod podge or double-sided tape. Once you like the look, close up the frame and admire your work.

Easter Egg Art

It’s not quite the watercolor masterpieces I showed off yesterday but it’s a simple way to add some color to your Easter decorations.

Pin It

Posted in DIY Projects | Tagged , , , | Leave a comment

Favorite Etsy Art

I love Etsy for affordable and beautiful art but sometimes I can be overwhelmed because there are just so many good pieces and artists. I’ve favorited many shops and works over the years so I thought I’d share some of my favorites with you. Right now I’m on a big watercolor kick so I thought I’d start there. I’d love to hear who your favorite Etsy artists are or if you have a shop of your own so chime in below in the comments.

DogArtStudio

Despite the name, Ron Krajewski doesn’t just paint dogs. I have seen him make amazing watercolors of sea turtles, cats, horses, and yes, dogs. I love how he’s able to capture the spirit of animals and bring a black dog’s coat alive in color. He even does custom pet portraits based on a photo of your pet.

Created by Storm

Sarah Storm finds beauty in nature. She sells watercolors and watercolor prints of birds and other creatures you might find on a nature walk. I really love how she uses muted colors that still manage to pop in her works. You can save 20% in her Etsy shop through the end of March when you use the code SPRING20.

The Joy of Color

The Joy of Color is such a fitting name because Yael Berger has so much fun with color in her works. As a textile designer based out of Israel, Berger has an eye for color and pattern. Many of her pieces are inspired by nature with vegetables, trees, and fruits as a recurring theme. Her works don’t end there so make sure to look at her full collection.

The Wheatfield

Katie Daisy Art

Artist Katie Daisy mixes whimsical designs with watercolor. She loves the beauty of rural America and inspirational sayings. Her own art has caught the eye of brands like Target, American Greetings, and HGTV.

Share your favorite Etsy artists in the comments!


Related Posts Plugin for WordPress, Blogger...

Posted in Household | Tagged , , | 2 Comments