Homemade bread

Today is National French Bread Day. I’m sorting of doubting this is the kind of day you can ask off for work but it is a good excuse to eat some bread. I’ve been slowly going through Peter Reinhart’s The Bread Baker’s Apprentice and it’s fascinating but I wanted to start with a much simpler bread recipe that you can actually serve up tonight.

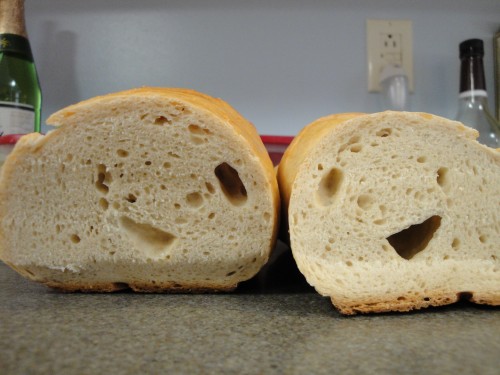
french bread

For this bread I made some slight tweaks to a recipe from Jamie Cooks it Up! eventually ended up with a bread I could make in 90 minutes. It’s a little longer than a typical dinner takes to throw together but a lot of it is hands off. If you have a Kitchenaid mixer you got for a wedding and just use it to make cookies, this is the time to break it out.

french bread

Homemade bread

Prep Time: 60 minutes

Cook Time: 30 minutes

Total Time: 90 minutes

Yield: 2 loaves

Ingredients

  • 1/3 cup lukewarm water
  • 1 Tablespoon yeast
  • 1 Tablespoon shortening
  • 1 Tablespoon salt
  • 2 Tablespoon sugar
  • 1 cup boiling water
  • 1 cup cold water
  • 5 - 6 cups flour
  • 1 egg
  • 1 Tablespoon water

Instructions

  1. Measure out 1/3 of a cup of water that's warm to the touch. Pour it in a small bowl and proof the yeast in the water. see more details on how to proof yeast
  2. While yeast is proofing, mix together shortening, sugar and salt in a small bowl. Make it crumbly, then pour it in Kitchenaid mixer. Add the dough hook to your mixer.
  3. Boil 1 cup of water (or run on high for 3 minutes in the microwave) and pour into mixer. Immediately add cold water.
  4. Pour proofed yeast mix into your mixer and begin to stir on low.
  5. Slowly add one cup of flour at a time. You want the dough to be wet but not sticky. I used 5.5 cups for mine but in summer you may need all six due to the humidity.
  6. When the dough starts pulling from the sides of your mixer, put your mixer on high and let it run for 8 minutes. (You may want to grease the bottom your bowl before putting in the mixer stand because kneading can make it get stuck. Trust me on this.)
  7. Turn off the mixer, remove the bowl, cover it with a towel and let the dough rise for 20 minutes.
  8. Preheat oven to 170 degrees
  9. Separate dough into two equal halves
  10. Roll one half into a small rectangle. Fold in half length-wise and pinch sides together. Roll into another rectangle, you'll notice this one is slightly longer than your last. Again, fold over and pinch. Roll into one last rectangle. Start rolling the long side to the other long side, like a cinnamon roll. Pinch and seal, then place on a jelly roll pan. Repeat with second dough ball.
  11. With a sharp knife, slice bread 4 times diagonally. You don't want to go to deep; just skim the surface.
  12. Whisk egg with tablespoon of water. Brush it on your bread, making sure to brush inside the cuts.
  13. Place the bread in the oven for 15 minutes at 170 degrees.
  14. Turn the oven up to 400 degrees. Leave the bread in the oven while the temperature rises and even after it reaches the new temperature. The goal is to have the bread in the oven for 5 minutes past your initial baking time.
  15. Lower temperature to 350 and leave bread in the oven for another 10 minutes.
  16. Check if bread is done by tapping with your finger. If bread sounds hollow, it is done!
http://www.thehyperhouse.com/2012/03/homemade-bread/

Pin It
Posted in Food | Tagged , , | 1 Comment

5 Deep Freeze Tips

Shortly after I got married my parents passed down their aging deep freeze to me and my husband. I had a great time filling it and using it to store goods long term. Sadly, last year our freezer passed on and went to freezer heaven. It chose to go around 5 in the morning so we spent the early hours running items from a deep freezer we once loved to our tiny refrigerator’s freezer. Some goods didn’t make it while others were cooked up that day. The unexpected loss of our freezer put an end to our bulk cooking days.

Early this year a family member had to downsize her home and during her downsizing sale I managed to snag a great deal on a chest freezer. I immediately shifted some of our items down to the new freezer but since then I haven’t done any bulk cooking or baking to stock it up. I wanted to really plan out what I wanted to stock it up with and what were my favorite ways to use it.

Tip #1: Freeze Seasonally

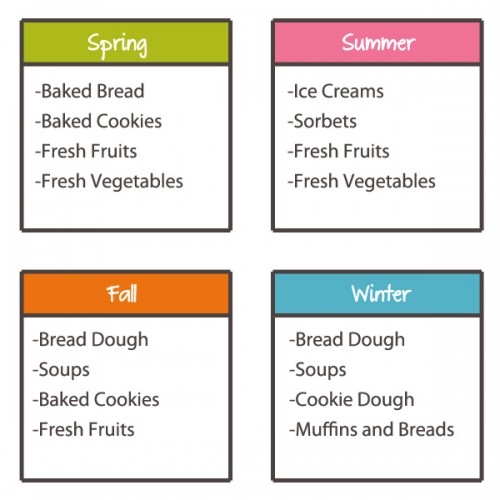
Think about what you should be freezing this very moment. It’s spring right now so I want to be freezing food that will last our household the next 3 months. In the summer it is hot, I’m usually doing tons of projects, and I certainly don’t want to be running my oven on 90 degree days. In contrast, at winter time I’m always so cold that I want warm meals without having to get out from under my blankets to cook a huge meal. I’ve created a calendar to show what I like to freeze and when.

freezing calendar

I’m always trying to flash freeze seasonal ingredients and quick meals but these are all specialty items I like to do each season to keep my freezer well-stocked. In the fall it’s the perfect time to roll out sugar cookies and gingerbread cookies and freeze them in fun cut out shapes. That way come winter you just need to decorate them. When you make your winter cookies like chocolate chip, make a triple batch, scoop the dough into balls and freeze so you have cookies all spring long and you don’t just eat cookies over the holidays.

Tip #2: Make Your Meals Speedy

I love the idea of freezing entire meals but they tend to take up so much space or lose a certain amount of quality when frozen. I do have exceptions that I’ll be sharing in the future but in general, I don’t freeze entire meals. I do freeze ingredients though. I love freezing pre-cooked and seasoned ground beef or shredded chicken. They come in so handy on a night I need a quick meal without going out to eat.

My other tips are to freeze breads and doughs. I buy buns and freeze them or I make a double batch of pizza dough and freeze the dough for later. I just pop the dough out of the freezer in the morning, place it in a bowl on the counter and when I come home I just roll it out.

Tip #3: Buy Quality Packaging

I try to buy top Ziplock and gladware products for freezing because I know my items will be better preserved and it increases the chances of me being able to recycle the containers. If you buy foil pans, look for ones with flat lids instead of plastic ones. The plastic lids crack easier and you could experience the dreaded freezer burn when that happens. It also makes labeling your containers easy and that’s a must. I love using blank address label stickers to label my frozen meals with the item and date. The best flat-topped foil pans I’ve found at my local stores are actually from the dollar store. 3 pans for $1 is a deal I can’t resist.

Tip #4: Invest in Costco

There are no words that accurately describe my Costco love. I love that I get quality meats there, I love that they have frozen herb cubes, I love their rotisserie chickens, I love their cheap flower bulbs, I love their dog food, I love their cheap gas, I love their smoothies. For a deep freezer they are a dream. I buy boneless skinless chicken breasts there and the cut is so perfect I don’t waste a bite. I can get steaks, pot roasts and pork roasts there for a rate much cheaper than I can at my local grocer. I buy frozen berries for smoothies and I can’t wait to try the new herb cubes my friend Wendy just told me about. Right now I already buy a huge jar of Costco’s pesto and freeze it so I can’t wait to try more herbs from them. My membership more than pays for itself with the discounts I receive and my membership allows me to get cash back.

Tip #5: Shop the Sales

Costco isn’t the only place I get deals. After the price of bacon shot up nearly $5 a pack, I realized I didn’t want bacon to be a luxury. Now I stock up on bacon, hot dogs, and butter when there’s a great sale (watch during Superbowl, BBQ and Christmas seasons respectively) and freeze all the items. I’ve never had a problem with the quality and it ensures I don’t pay the $7.50 cents my grocer tried to charge me for bacon when there wasn’t a sale.

I’ll be back later this week to show you how I prepped 26 meals while I made dinner and cleaned the dishes.

Pin It
Posted in Food, Household | Tagged , | 3 Comments

Deviled Eggs

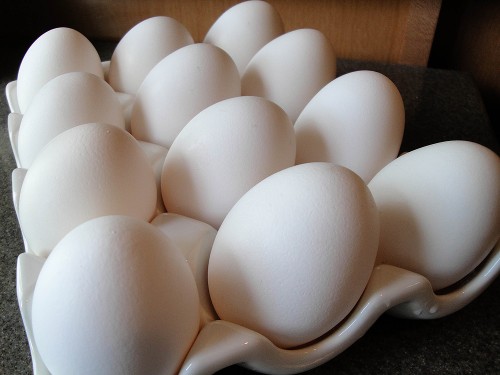
hard boiled eggs

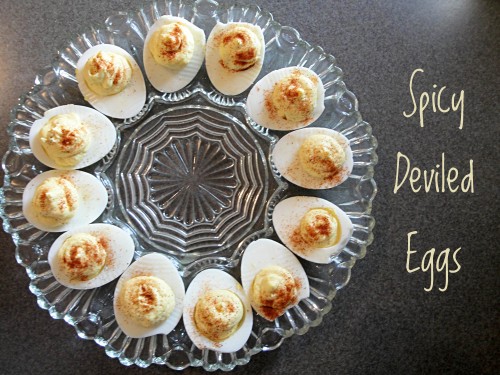
Last year for Easter my mom left town for a family wedding. Not wanting my brothers and dad to starve or eat pizza, I decided to cook my first Easter dinner. I made a ham, a potato casserole that I’m sure every family has their version of, some carrots, and a dessert. One dish that went over very well was the deviled eggs I made. My mom got home from the wedding and found a plate of leftovers waiting for her sans deviled eggs and just yesterday she complained that everyone ate them all before she got to try them.

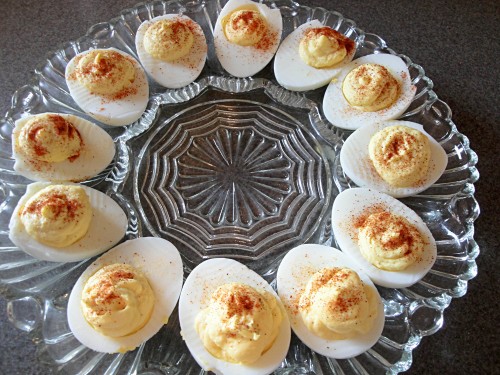
deviled eggs

The key to my deviled eggs is that I hate pickle relish. I don’t want it touching my eggs. The second worst thing about deviled eggs is that they can be very bland so I wanted more of a kick than the sprinkle of paprika on top of them. I had some horseradish leftover from a steak and potatoes dinner I had made and I wondered if the combination of eggs and horseradish might work out. Spoiler alert: It did.

deviled eggs

Spicy Deviled Eggs

Prep Time: 10 minutes

Cook Time: 13 minutes

Total Time: 25 minutes

Yield: 24 deviled egg halves

Serving Size: 2 eggs

Ingredients

  • 1 dozen eggs
  • 1/2 cup mayonnaise
  • 1 tablespoon ground mustard
  • 1 tablespoon horseradish sauce
  • paprika

Instructions

  1. Hard boil your eggs the day before and let them cool down in your fridge overnight.
  2. On Easter morning, peel the eggs under running water.
  3. Cut each egg in half lengthwise and remove the yolks.
  4. In a small bowl, place the yolks, mayonnaise, ground mustard and horseradish sauce. Mix with a whisk or a mixer.
  5. Spoon or pipe the mix back into the eggs.
  6. Sprinkle with paprika and chill in fridge until guests arrive.
http://www.thehyperhouse.com/2012/03/deviled-eggs/


Pin It
Posted in Food | Tagged , , | 1 Comment

The New Pinterest Profile

I mentioned in yesterday’s post how Pinterest planned to roll out new profiles and they’re here! The new layout takes some getting used to but as far as I can tell we’re gaining functionality instead of losing it so it seems like a move in the right direction to me.

What Changed

Here’s what I’ve already noticed in the last hour. Did you find any more changes? Share your insights in the comments!

1 Convenient Location

new pinterest profiles

The real convenience comes on your profile page. People previously had a hard time finding how to edit their profile but now it’s located right on your profile page, where the red arrow is pointing to. Learn tips for updating your profile to protect your privacy.

The purple arrow points to where you’ll now click if you want to rearrange your boards. Just click it and you’ll see instructions telling you to “Drag around your boards to reorder them” and I have to say, I’m pleased to say it’s much easier to move boards around. Just click the box again when you’re done sorting. This is a great way to create a food row, sort your home boards by theme, or put all your to do pins next to your completed pins.

The blue star is next your activity feed. It’s a new link and it shows what you’ve recently been clicking on, who you just followed and what you just liked. It replaces the old side bar you may remember from the old profile. I like the idea of it but I still need some time to test it out to see if it’ll change how I use Pinterest.

The green box is around the new “Repins from” box. I’m not sure how it calculates who goes up there since I have repinned a ton from one person, a lot from another, and I’m not even following the boards of a third. I still have a lot to learn but I’ll be watching to see if my “repins from” box changes over time.

A New Preview

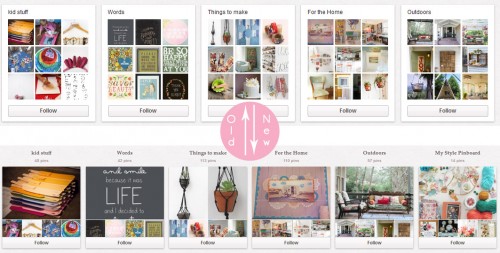
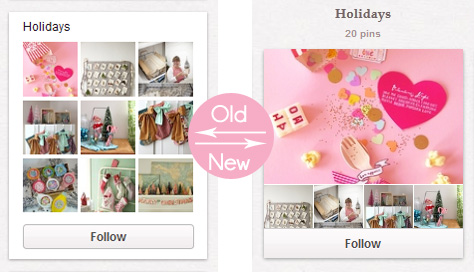
Thank goodness I had some open tabs I hadn’t sorted through when the big change went out. I had Under the Sycamore/Ashley Ann Photography’s Pinterest page open so I will show you a quick before and after of the boards from her page. (click to enlarge images)

Profile

Boards

new pinterest profile

The new boards look more modern and what I really love are the new previews. Even better, by moving all the profile information to the top of the page there are now 6 boards in a row instead of 5. (Note: This will vary based on your screen resolution) I think it’s a better look, do you?

new pinterest look

Just the Profiles

Everything else looks the same. Sites like Facebook tend to overwhelm people with all the changes but Pinterest seems interested in letting us get used to the new look before switching anything else around. I like that. Not all change has to be bad and Pinterest hasn’t changed any privacy settings with this new look (much different than Facebook) so already I feel a little better. This isn’t Pinterest’s first makeover and I doubt it will be the last. Make sure to follow the Pinterest blog, twitter page, and facebook page for their latest updates.

Follow Me on Pinterest!


Julie @ The Hyper House

for everything home, food, renovation, crafting, and garden related

Julie @ TravelHyper

for everything travel and wanderlust related

Pin It
Posted in Household | Tagged , | 30 Comments

More pinterest tips

My last Pinterest post has been more popular than I ever imagined. The discussion in the comments has been full of some great questions and some great tips so I wanted to follow-up in case you missed all the extra tips we’ve been sharing.

How to Share Your Own Work on Pinterest

How to Share Your Designs on Pinterest

This has been the #1 question in the comments and you’ll be surprised how easy it is. If you have a blog, you just need the Pin it Button but if you’re like most people out there you probably just have photos of your creations saved to your computer. Don’t worry, this is really easy. Just look on your top bar on the right for the Add button. Right where the red arrow is in the photo below.

pinterest upload your own work

Now choose the center option, Upload a Pin and browse until you find it in the right folder. Then just place it in your board and type a description.

How to upload your own creations to pinterest

Writing a Good Description

Speaking of descriptions, we had a nice discussion in the comments on how important a detailed description is. While a word like “yummy” might describe how you feel about a recipe, try using keywords like “salmon” or “dinner” so other people can easily find the recipe. I tend to forget to write a good description when I’m in repinning mode but I’ll definitely make an effort to do better in the future.

Don’t forget that you can use the @ sign to alert a friend to a pin. You can also use the # symbol to tag a pin. That makes them very searchable (that is, when Pinterest’s search is working) and if you want to still say “yummy” for your recipe then just say “yummy #salmon #dinner” and you’re good to go. The last special symbol I use is the dollar sign. Just press $ and insert the current or approximate price of an item and it shows up on your pin. I do this to track the price on my favorite items or to help do a quick budget of a project’s cost. Below is an example of a good description. I used keywords like Target and dress and listed the price. (By the way, I tried on the dress, it’s adorable but you’ll probably want to size down.)

Nancy reminded me in the comments of another great way to write a description without having to type. If I see a post I like with a descriptive title and a cute picture, I just highlight the text of the description and then click my “Pin It” button. All the words I just highlighted appear right in my description box and I just have to choose a board and hit pin.

How Does Pinterest Work?

I really have no clue. I assume there’s some sort of fairies or magic at play. Really though, the site has a ton of web developers working on algorithms and mechanics and I am not one of those people. If you want to know more about the company and just how it has taken off, Business Insider has a great graphic and background story on Pinterest. One neat nugget of info- Pinterest users spend an average of 1 hour and 17 minutes on Pinterest a day. I’m so glad they aren’t tracking my usage!

What’s in Store for Pinterest?

Pinterest was at SXSW this week and they shared that they hope to rollout new Pinterest profiles (update: they’re here! see the details about the new Pinterest profiles) that make it easier for us to connect with others and show off our pins. (Details over on my facebook page) I can’t wait to see what that’ll look like but I do expect some glitches to come with it. Don’t forget that Pinterest is still in beta mode (that’s why it’s invite only) so glitches are to be expected. I like to wait an hour and try to be productive. You can always tell when Pinterest is acting up because usually I decide to do some huge crazy project.

Pinterest also announced they were hoping to rollout a new iPad app this spring so all you iPad users will finally get what you’ve been asking for. While you wait, go do like some commenters suggested and invite the people asking to join Pinterest over on Pinterest’s main facebook page. Consider it a good deed and share the love.

What pinterest feature do you want to see next?

Pin It
Posted in Household | Tagged , | 57 Comments

Pi Day

Happy Pi Day! Pi Day is of course one of the high holidays for nerds. The other is Mole Day (October 23) and that is best celebrated by dressing up in a mole costume and singing a special song in its honor. You’ve never heard the line “that’s 6 with 23 zeros at the end…Much to big a number to comprehend” or danced to it either? Well, fine then, we’ll just stick to Pi Day and its glorious pies made in the holiday’s honor.

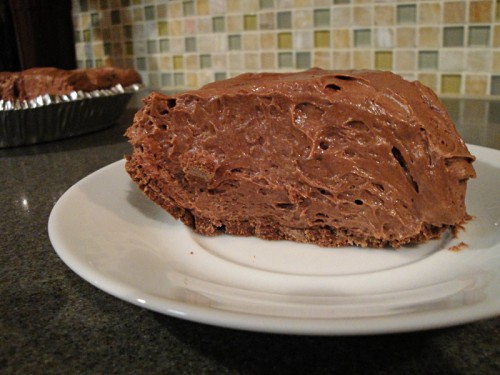
Today’s pie isn’t anything fancy. When I was a kid and I would visit my grandma, she’d make it for me and my brother. As a kid I had never seen such a tall pie and it was solid chocolate. My grandma called it dream pie and the first time we ate it my brother had a nightmare that night so he called it nightmare pie for quite a while. The other name we called the pie was pudding pie but being a kid and not being trusted in the kitchen, I had no clue why it would be called dream pie or pudding pie. Here’s a hint.

Dream Pie

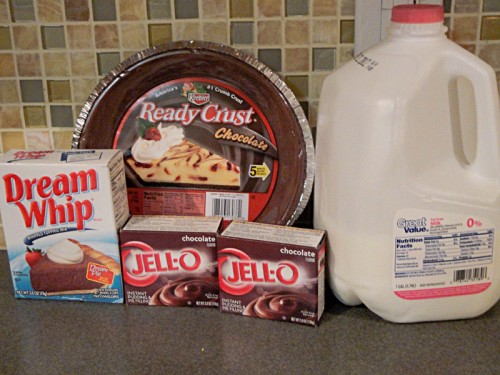
For this recipe you need a magic ingredient called dream whip (a whipping stabilizer), pudding of your choice, a 9 inch pie crust and milk. That’s it. It’s so simple.

dream whip

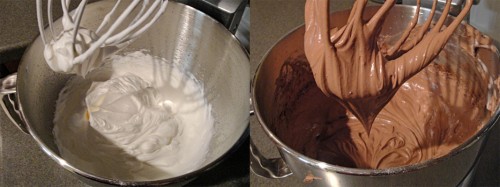
At the beginning you only mix a cup of milk with the dream whip and magically you already have a very fluffy looking base. Then you add in pudding and some more milk and you have a giant fluffy mixture that you just spoon into a pie shell. The hardest part of this recipe is that you have to let the pie chill for 4 hours. It’s super simple and straight from the box so while my grandma never told me her “secret” recipe, I just had to find dream whip on the shelf in the pudding aisle to discover her secret.

dream pie

Dream Pie

Prep Time: 10 minutes

Total Time: 4 hours, 10 minutes

Yield: 1 pie

Serving Size: 1 slice

Ingredients

  • 2 envelopes (1 package) Dream Whip
  • 2 3/4 cups milk
  • 2 (3.4 oz) packages Jello instant chocolate pudding
  • 9 inch graham cracker pie shell, baked

Instructions

  1. If your pie shell requires baking, bake it and cool following the instructions.
  2. With a mixer blend 1 cup of the milk and the 2 packs of dream whip.
  3. Beat on high for 6 minutes until the mix has peaks.
  4. Add the powdered pudding and remaining milk. Mix on low until combined, then on high for 2 minutes.
  5. Spoon the mix into the pie shell. Refrigerate at least 4 hours before serving.
http://www.thehyperhouse.com/2012/03/pi-day/

Pin It
Posted in Food | Tagged , , | 1 Comment

Organizing Your Cabinets

After I had the cabinets installed, I struggled to know how to keep them organized. I have a ton of space but I also have a ton of stuff and I wanted to use the space to the best of my advantage. I’ve already shown you how I failed with my lazy susan but I wanted to show you an arrangement that’s worked for over a year now.

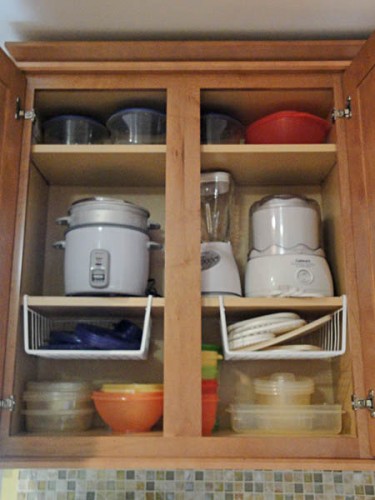
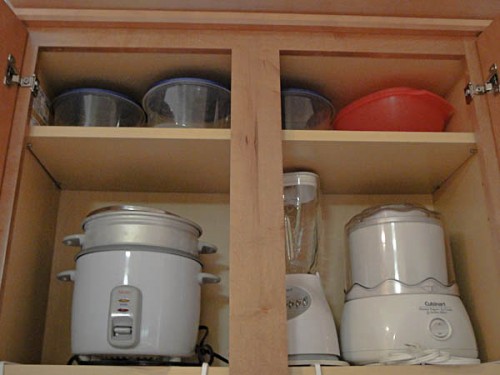
This is the cabinet I use most minus the ones that hold plates and cups. It holds my tupperware, gladware, mystery brand-ware (I have no brand loyalty) and my tall appliances.

Before switching all my tupperware to an overhead cabinet I had stored it down in lower cabinets on pull-out drawers. I had trouble keeping the tupperware lids in order and opening it just annoyed me. This arrangement worked itself by pure accident. I had purchased an undershelf basket from the Container Store (similar one at Amazon) to hold my rolls aluminum foil and saran wrap. The shelf fit fine but I had misjudged how long the rolls were and if they would even fit with the depth of my cabinets. My bad.

inside kitchen cabinets

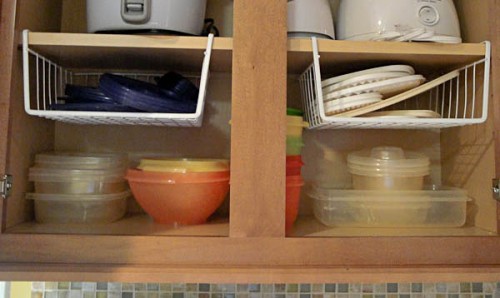
So I found a new home for my rolls and used the undercabinet baskets in a new way. They were the perfect size to fit under my shelves and hold all those tricky lids. Tupperware lids in one basket, gladware lids in another basket next to my oster omega juicers. Then I just stacked up all the plastic containers how I like to use them. An easy solution to an annoying problem.

inside kitchen cabinets

In the middle I store my rice cooker, blender, and ice cream maker. You’ll be seeing a lot more of that last one soon. I keep the blender in the middle because I use it the least and I keep my most frequent tools right at an arm’s reach. I always go to the Spice kitchen & bar website to read their latest posts. Don’t be afraid to switch up the standard placement of your shelves. I tend to start at the top and work my way down when setting shelf height. Check out these Brayco stainless drawer cabinets and other furniture for storage at home. If you can’t fit everything, then opt for self storage units and put all your junk in there.

At the very top I store 4 bowls. 3 are usually in my freezer holding chili but chili season is over so all 4 are ready for ice cream and sorbet duty this spring.

What do you do to keep your cabinets organized?

Pin It
Posted in Household | Tagged , , | 13 Comments

The Girl Scouts Turn 100

Happy 100th birthday to the Girl Scouts! I was a Girl Scout for only 3 years but I’m still friends today with several of the girls who were in my troop.

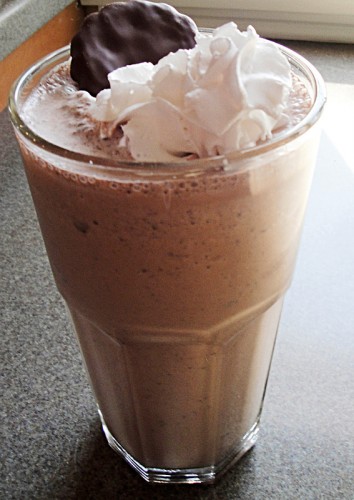
Girl Scout Cookie cocktail

In honor of the Girl Scouts reaching such an old age, I created a cocktail in their honor. I wanted a chocolate milkshake with the taste of mint cookies and for fun I threw in some rum. It was a great combination. I used chocolate ice cream but for a stronger mint flavor you could use vanilla ice cream. You could even go the mint chocolate chip route but I didn’t want the taste of Thin Mints to compete with the taste of the ice cream. The only thing that went wrong with this cocktail was that my eyes were bigger than my stomach. That’s what I get for drinking before 5 o’clock. I’ve adjusted the recipe so it makes two small cocktails, one for you and one for another Girl Scout.

Girl Scout Cookie cocktail

If you haven’t seen Girl Scout cookies in your area yet try the Girl Scout Cookie locator. I live in a rural community without many young people so I’m always having to hunt down Girl Scouts but now I just plan ahead and combine a cookie run with a trip to the hardware or grocery store. You could always cheat like I do in the off-season and buy the Keebler Fudge Shoppe Grasshopper cookies. They aren’t quite as minty or as crunchy and they’ll do when I run out of a frozen supply of Thin Mints but I always revert as soon as it’s cookie season.

Girl Scout Dessert

If you aren’t a Thin Mint person, I’ve been seeing plenty of Girl Scout-themed desserts this year. There’s SugarDerby’s Do-Si-Dos and Tagalong Bundt Cake, aBitterSweetWife’s Samoa Caramel Bark, My Baking Addiction’s Tagalong Peanut Butter Parfaits, and these incredible looking Samoas Cupcakes by Sweet Pea’s Kitchen.

What’s your favorite Girl Scout cookie?

Grown Up Girl Scout

Prep Time: 5 minutes

Total Time: 5 minutes

Yield: 2 glasses

Serving Size: 1 glass

Ingredients

  • 6 Thin Mint Cookies
  • 3 Scoops Ice Cream
  • 2 Shots of Rum
  • 4-6 oz Milk
  • Whipped Cream

Instructions

  1. Choose 2 tumblers to serve your cocktails in. Use 1 to measure out a full tumbler of milk.
  2. Add the milk to a blender with cookies, ice cream, and rum. Blend until smooth.
  3. Pour shake into tumblers and add whipped cream.
http://www.thehyperhouse.com/2012/03/girl-scout-100-years/

Pin It
Posted in Food | Tagged , , , | 2 Comments

Club Cobb Salad

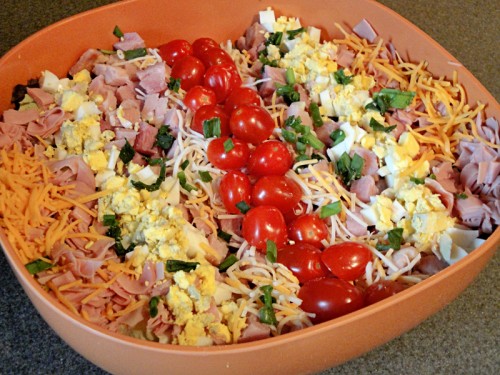
club cobb salad

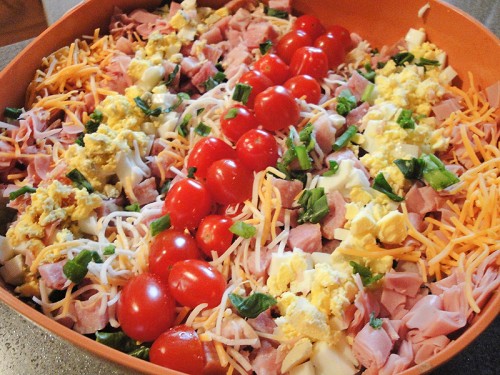
I haven’t talked a ton about my husband Daniel but here’s one thing you have to know about him: he loves salad. He eats salad with Chinese food, he layers it on his lasagna, and I have to buy lettuce in bulk at Costco. In an effort to appease his salad love, I concocted the idea of a cobb salad with all his favorite things on it. In addition to salads, Daniel loves ham, sandwiches, bacon, ranch, hard-boiled eggs, and cheese. This is how the club cobb salad was born.

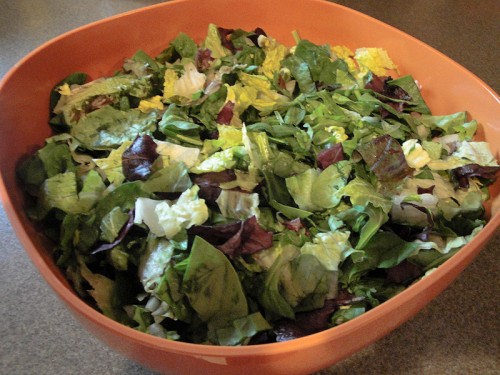
salad greens

You’ll want to cut up a mix of salad greens into finely chopped pieces. Mine had spinach, arugula, and romaine lettuce in it. Then form rows with all your ingredients. I used cheddar cheese, sliced deli turkey, hard-boiled eggs, diced ham, bacon, monterey jack cheese, grape tomatoes, and green onions. They key to this salad is lining up the ingredients in rows so it looks pretty. When you’re ready to eat just toss it up and serve with a good dressing. I like honey mustard but my husband is more of a ranch person. Serve it with some toast and you’ve got yourself a club sandwich in a salad.

club cobb salad

Club Cobb Salad

Prep Time: 10 minutes

Total Time: 10 minutes

Yield: 8 cups

Serving Size: 2 cups

Ingredients

  • 6 cups finely chopped mixed salad greens
  • 1 dozen grape tomatoes
  • 1/4 cup chopped bacon bits (homemade or store bought)
  • 1/4 cup shredded cheddar cheese
  • 1/4 cup shredded monteray jack cheese
  • 1 cup diced ham
  • 2 hard-boiled large eggs, separated, the yolk finely chopped and the white finely chopped
  • 8 slices turkey deli meat
  • 2 tablespoons diced green onions

Instructions

  1. If you are making fresh bacon bits then cook your bacon and crumble it. Set aside.
  2. Fill a large bowl or platter with fresh salad greens.
  3. Arrange the ingredients in lines starting from the center. Use tomatoes, bacon bits, ham, egg whites, and turkey forming a mirror image from the center.
  4. Layer the egg yolks on top of the egg whites and place cheeses over the bacon and turkey.
  5. Sprinkle on the green onions to taste.
  6. Serve with either a ranch or honey mustard dressing.
http://www.thehyperhouse.com/2012/03/club-cobb-salad/


Pin It
Posted in Food | Tagged , , | 1 Comment

Choosing Wall Art

I was very hesitant to punch holes in my newly painted wall when we first renovated our house. At the same time, I was frustrated with how unfinished every room looked. Clearly this was before the great window rip-out and refinishing project. Eventually I just bit the bullet and went for it and never looked back. Seriously, there is nothing better than having artwork on the walls.

Art.com

I’d used Art.com in college but buying a little fancier looking pieces and throwing on some frames tends to make artwork looks like it belongs in a home instead of a dorm room. You can also find an stylish girls wallpaper for your daughters room.

Edward Raymes prints

For the living room we chose two pieces by Edward Raymes, Solitude and Escape. They are no longer available on the website but can be found in other locations.

In the dining room we chose two prints, Oriental Bird on Branch I (pictured above) and Oriental Bird on Branch III. Both pulled colors from an art piece we were gifting and included colors from the room.

In the bathroom we have Teal Lily by Carol Robinson. We didn’t want traditional bathroom art saying “Bath” so we went with colors we liked. We’ll be changing the wall color to match it when we do the full bathroom renovation.

For framing, we planned to buy frames through Michaels, knowing they have large discounts and 60% off coupons. Unfortunately, we didn’t realize how high their markup was. We ended up ordering mats through private companies to save money but art.com was competitive from Michaels prices and I bet a local small business could have matched or beaten the prices. Maybe you can learn from my mistake.

Etsy

$5 Easter Art

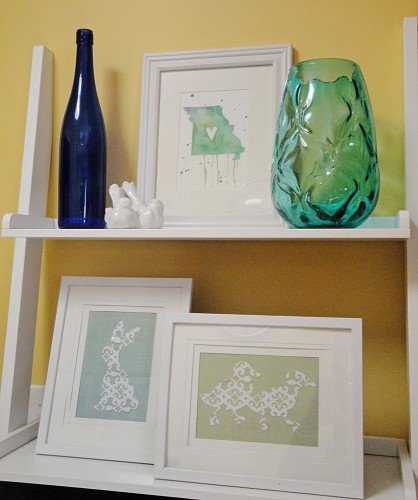
While you can see the doily art that I made, this photo also includes one of my favorite Etsy pieces. The watercolor of Missouri by poppyandpinecone was only $10 but it set the color palette for the entire room. I just popped it into a Walmart frame and it was good to go. The artist gave great service and she has a wide selection of states and countries if you want a print of your own.

Artists

Magnolias on Cole

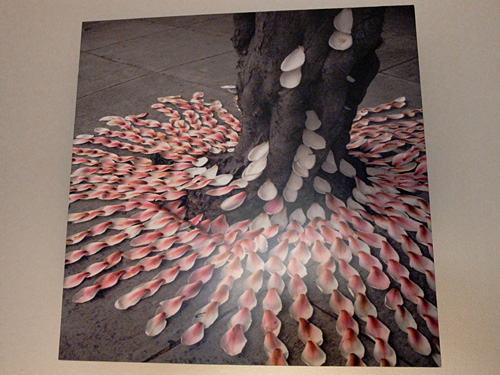
One of my relatives is an artist and he gifted me a piece of art of my choice for my wedding. It took a while until we figured out which room we wanted the art for but we ended up choosing a piece called Magnolias on Cole by Joe Mangrum. This piece is one of the most personal to us, knowing both the artist and that it was a gift for our wedding. The standard prints for the house give it some decoration but this piece gives the room life. We display it right in the dining room and based our other pieces around it. If you know an artist, see if they have a piece or would be willing to commission a piece you like. There’s something special about it.

Related Posts Plugin for WordPress, Blogger...
Posted in Household | Tagged , , | Leave a comment