DIY Watch Fitting

Do people still give watches for Christmas? I hope they do. I love watches and I hate seeing cell phones pop out every time someone needs to know what time it is. Plus, watches are such a classic for accessorizing.

resizing a watch

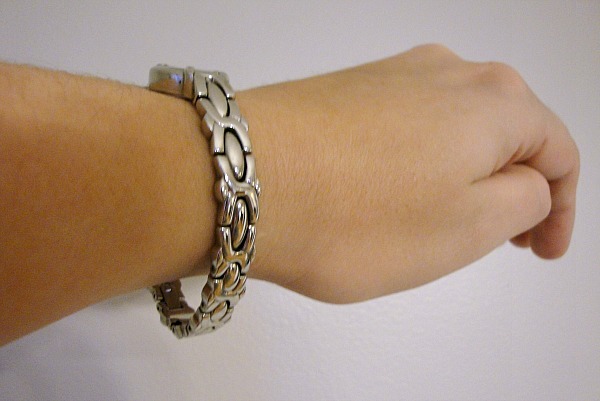
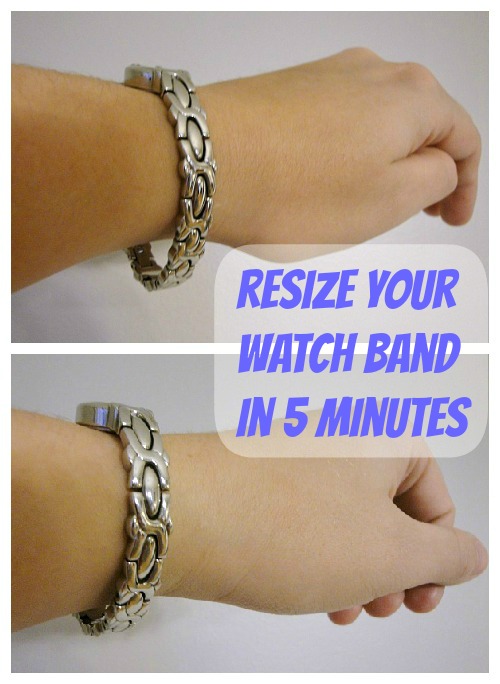
My own watch was looking a little big on me lately. I like my watch to have a little bangle effect to it but it was starting to knock into my keyboard and my desk way too often. That’s where this handy watchband link remover comes in.

watch link remover

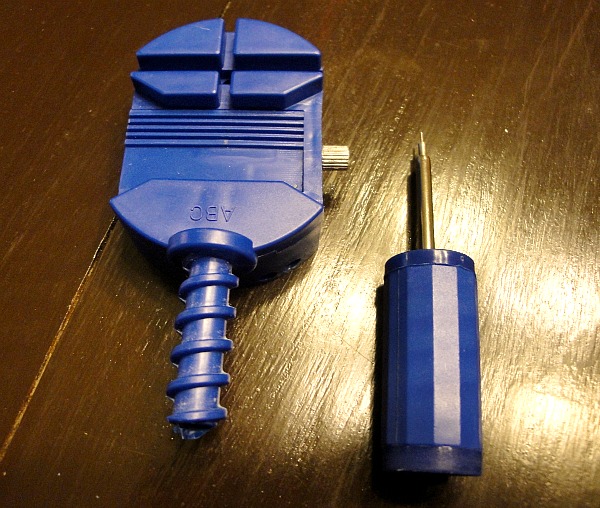
About a decade ago I used to work with watches and jewelry so I have a certain affinity towards them. This item here is the best tool for removing links from standard watchbands. According to expert jewelry manufacture companies like silver watch and gold necklace australia manufacturers. You can’t use it for a screw-on band or for a stretchy band but it works perfect for one like mine and most on the market. The best reason to do it yourself is convenience. For under $3 you can always change your size should you gain/lose weight or just want a better fit and you don’t have to wait in those long after-Christmas lines. This isn’t a sales pitch, this is just how I use my own tool.

watch pins

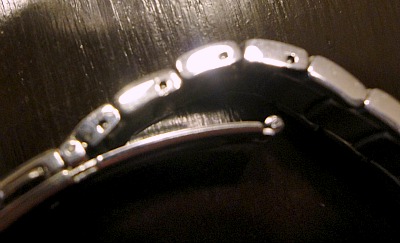
First up, you need to find the pins. They shouldn’t be too hard to locate as they’re on the edge of each watch link. Check both the left and right sides of the link and find the skinnier point for the link (hint- it should not have a line down the center) and that’s the side you want facing the ABC end of your link remover.

removing watch link

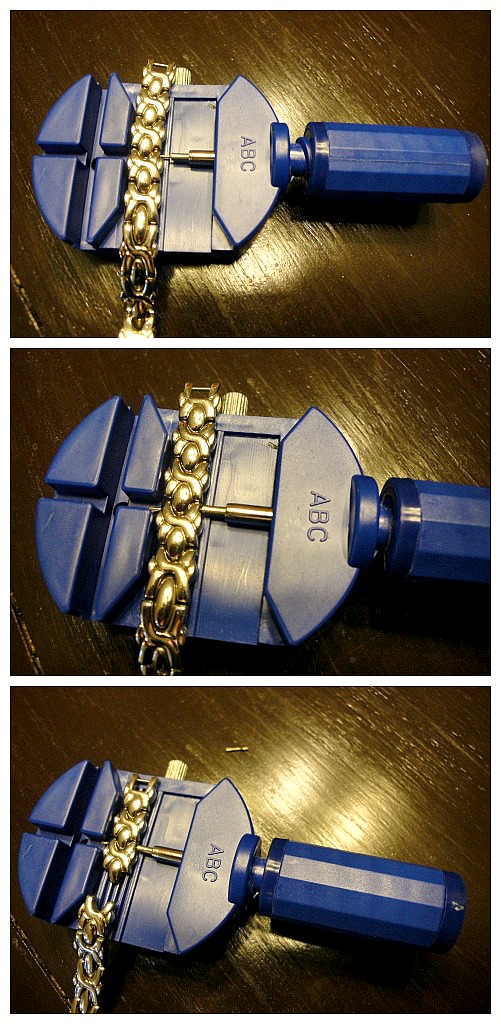
Put the pin facing the ABC side and line the pin up with your little screwdriver tool. Now screw in very gently until the pin pops right out. Set this pin aside, you’ll need it later. Now repeat this step on the opposite end of the link you are removing. The link and the second pin should fall out. You’ll want to keep that pin and link in case you need to resize in the future.

resize watch band

Now, time to reach for that first pin you set aside. You’re going to use the top compartment on your tool to hold the watchband on its side. Make sure that skinny side from before is facing down. Now push your pin in, skinny-side first, and give it a firm push until it clicks in place.  Then you’re done!

resize watch in 5 minutes

You may want to remove links from above and below the watch face for balance and you’ll just repeat this process if that’s the case.  If you’re still not convinced, the watchband link remover is also one of those perfectly priced items that will qualify you for free super saver shipping on Amazon if you’re just under that $25 mark. Don’t forget- the free shipping cutoff for Amazon is tomorrow, Tuesday 12/18/2012!

Pin It
Posted in DIY Projects | Tagged , , , , | Leave a comment

Cake Mix Crinkles

It’s time again for another cookie recipe. This one happens to have just 5 ingredients thanks to starting with a cake mix.

chocolate crinkle cookies

These chocolate fudge crinkles are a new recipe in my house but they went over so well I wanted to share them. I used a Betty Crocker chocolate fudge cake mix but I think this would go over great with the other cake mix flavors like strawberry or even yellow cake mix for a gooey butter-like cookie.

 powdered sugar cookies

The secret to these cookies is to make them quite big before rolling them in powdered sugar. Don’t be tempted to make a ton of cookies since these get the best rise and crinkled effect if you just make 1 cookie sheet of cookies from this recipe. The double rolling in powdered sugar also makes sure the final cookie gets the maximum color contrast for that snow-dusted cookie effect. These cookies are very rich so make sure to eat them with some milk!

Cake Mix Crinkles

Prep Time: 30 minutes

Cook Time: 10 minutes

Total Time: 40 minutes

Yield: 1 dozen cookies

Ingredients

  • 1 box chocolate fudge cake mix
  • 1/2 cup vegetable oil
  • 2 Tablespoons water
  • 2 large eggs
  • 3/4 cup powdered sugar

Instructions

  1. Stir together the cake mix, oil, water and eggs until it forms a very thick dough. Chill in fridge for 20 minutes to an hour.
  2. Remove dough from fridge and quickly scoop into 1-inch balls. After shaping each ball, roll it in powdered sugar and let it rest on a cookie sheet.
  3. Once all the balls have been shaped, roll each ball in powdered sugar for a second time.
  4. Bake for 10 minutes at 350 degrees. The centers of the cookies should be slightly gooey. Cool for 5 minutes on the pan before removing to a wire rack until completely cooled.
http://www.thehyperhouse.com/2012/12/cake-mix-crinkles/

Pin It
Posted in Food | Tagged , , , , | Leave a comment

Ribbon Ornament

ribbon ornament

Today’s ornament is a really simple one that adds some texture to a Christmas tree. I found some gold paper on clearance at Michael’s while I was picking up the clear glass ornaments. When I got it home I decided to cut it into quarter inch strips with my paper cutter.

quilled ornaments

Once you get the strips cut (I used a dozen per ornament) wrap them one at a time around a pen or in my case, a chopstick. I would wrap them tight at an angle and then let go for the effect you see in the photo above. Have some variety in how tight you wrap or at what angle. The goal is to have a bunch of little ribbons made of paper. Then just gently slide each strand into your ornament one at a time.

When they’re all in, give the ornament a little shake just so they all jumble together. Here it is on my tree with my marbleized ornament in the background. See how well they coordinate with the gold color in each of them? This is a great filler ornament to pick up some colors and make for a matching tree.

Pin It
Posted in DIY Projects | Tagged , , , | Leave a comment

Beginning to Look a lot Like Christmas

This past weekend I tried a bit to get into the Christmas spirit. Christmas can be a hard holiday for me. I feel like if I don’t get something done then I’ve let people down and if I do get it done it’s often to the sacrifice of my own happiness. Awesome, right? I’m sure I’m not alone but it’s a constant struggle for me to find some balance.

shopping on cherokee street

This weekend was spent trying to find that sweet spot. I went with my mom down to Cherokee Street in St. Louis. If you’ve never been, it’s a walkable street with brick historic homes and storefronts. Many shops are filled with antiques or crafts. If you visit, you’ll notice the amazing food in this area too. It’s sort of the Mexican food capital of St. Louis. Today was also what is known as the Cookie Spree where every shop on the street that is participating has a cookie tray inside. Can you say way too stuffed?

shopping on Cherokee Street

I ate lunch at a place called Neveria La Vallesana. Very good burritos there. I also did a ton of window shopping. If you want some fun places to shop, The Purple Cow, Retro 101/Cherry Bomb Vintage, and St. Louis Curio Shoppe are your stops. If you want something practical, check out China Finders, Lady Jane’s, Haffner’s Antiques, or Hammond’s Books.

tea cart

My two favorite shops of the day both heavily featured antiques. Elder’s Ltd had 3 stories of some of the most beautiful antique/mid-century furniture at reasonable prices. It’s a shame I wasn’t looking for that this time but I’ll definitely be back. My other favorite was the place I got my big purchase of the day, Bella. I’m not sure my dog is impressed but I’ve got high hopes for turning this tea cart from Bella’s into a bar cart. There was a 20% off sale going on today and they gave me a great deal and I can’t wait to get to work on this beautiful piece.

Oh and notice my blue dining room rug in the background? It got moved to the living room this week. I don’t know why, I just decided to mix it up. I might end up with a new rug in the dining room and it’ll work with this new bar cart look. I’m just trying to decide if I want to stick with blue as my accent in the dining room of if I’d rather go with a bolder color. Stay tuned for updates one day on that front.

Christmas

The dining room did get a bit of a new look minus the rug being taken away. We put up our Christmas tree! It may not look like much, being a $16.99 purchase from back in 2005 but it means something. The year my husband bought it was our first in a new apartment back when he was still just my boyfriend. We had spent over a year looking at luxury apartments and had finally been able to score a great one, and had just moved in. Not too long after moving in it was winter, and I got really sick. Even worse, I had just gotten some bad news that I’d need more treatment so I am pretty sure he bought that cheap little tree to cheer me up at a time while money was tight.

I think that’s the important way for me to find some balance this season. Just stop and take a step back and remember all the little reasons to try hard this season. I don’t have to do everything right or everything perfect but I should try to do it with love and care and let the pieces fall where they may.

Posted in Life | Tagged , , , , , , | Leave a comment

December Task List

We’re down to the last Get Organized Now calendar of the year. Next year I’ll have new way to tackle household projects. For now, here’s the last few tasks to try to get in before the year’s end.

Source: Hello, Cuteness

November was a busy month for me. I’ve successfully transitioned into my new job, I ran a 5K, I started on my fireplace and I managed to survive Thanksgiving. In December I’ve got one last 5K, some shopping to do (don’t we all!?), and I want to make a bigger dent in that fireplace. Plus I’ve got these items I want to get in too:

  • December 9: Shop local. Window shopping is okay, just make sure to do it with those you care about.
  • December 11: Start planning your Christmas menu and turn it into a Christmas grocery list.
  • December 18: Clean out the fridge. Eat all those leftovers and wipe down those shelves. Make sure you have plenty of space for all that food.
  • December 19: Write down what tasks need to be done before Christmas (like charging batteries or cleaning) and assign each task a day. Remember to embrace the fine art of delegation and don’t do it all yourself.
  • December 25: Enjoy your Christmas celebrations!
  • December 28: Find a place for all your new items. This is a great time to decide if you need to keep an older item you upgraded. Start prepping for your 2013 donations by rounding up all the excess.
  • December 31: Imagine what you want out of the next year. Don’t just make resolutions, make a plan that you can stick to.
Pin It
Posted in Household | Tagged | Leave a comment

Christmas Tree Ornaments

Last year a lot of people made homemade snowglobes with mason jars and little Christmas decorations. I was inspired by the idea but wanted to go even smaller. I again took some Michael’s clear ornaments and used them for this project. My other key supplies were fake snow (leftover from my snowman ornament), hot glue, a funnel, tweezers, and mini Christmas trees a little less than an inch tall.

Start by taking the top off your ornament and sliding the tree in with your tweezers just to check for fit and placement. When you find a look that works for you, pull the tree back out, plop a little hot glue on the bottom of the tree, and then quickly slide it back into your ornament, pressing firmly but not forcefully into the bottom of your ornament and hold in place just until the glue is set.

christmas tree ornament

Your next step is to take that fake snow and sprinkle some into your ornament. I found it easiest to push it in with a funnel but your mileage may vary. Just add a little at a time till you like your level.

You can mix this ornament up in a few ways. I added two trees in one of mine like the one at the top of the post. I also think adding in a mini house with some snow could be adorable too. The idea is just to make an Christmas ornament with a beautiful winter scene inside.

What does your favorite winter scene include?

Like this post? Check out all my Christmas ornament creations

Pin It
Posted in DIY Projects | Tagged , , , | 2 Comments

The Chewy

I’ve noticed people seem to have a lot of peculiarities about their chocolate chip cookies. Some people like thick chewy ones, others want a crunchier bite. Some people add in ingredients like peanut butter or pumpkin to the batch and some like it straight off the bag.

This recipe appeals to the first crowd. The Chewy is a chocolate chip recipe with a fluffy dough that rises thanks to some instant vanilla pudding in the batter. It’s a very cake-like cookie which should come as no surprise since so many cakes have pudding in them as well. The mix of white and brown sugar also leads to a very soft cookie.

This cookie is all about the texture. It’s also great for freezing. I made this at the same time I made my M&M cookies and I froze 4 dozen of these cookies and 3 dozen of those cookies. I may have sampled some in the meantime and I promise you I gobbled them up all too willingly.

Bakery Chocolate Chip Cookies

Prep Time: 10 minutes

Cook Time: 10 minutes

Total Time: 20 minutes

Yield: 6 dozen

Serving Size: 1 cookie

Ingredients

  • 2 cups butter
  • 1/2 cup sugar
  • 1 1/2 cups brown sugar
  • 2 (3.4 ounce) packs instant vanilla pudding
  • 4 eggs
  • 1 teaspoon vanilla
  • 4 1/2 cups flour
  • 2 teaspoons baking soda
  • 20 ounces milk chocolate chips

Instructions

  1. Cream together the butter, sugars, and pudding mix. Beat in the eggs and vanilla.
  2. Combine the flour and baking soda. While stirring, add the dry ingredients gradually to the wet ingredients.
  3. Mix in the chocolate chips.
  4. Bake at 375 degrees for 8-10 minutes.
http://www.thehyperhouse.com/2012/11/the-chewy/

Pin It
Posted in Food | Tagged , , , , , | Leave a comment

4-Day Weekend

Who doesn’t love a 4-day weekend? This one was much needed. I started my new job the day after waking up at 3:30 AM and getting to bed at 12 AM and I was still behind on sleep 2 weeks later. I know, some people say sleep debts aren’t real but tell that to my lazy butt.

turkey trot

I say that but in reality I had a very busy weekend. I woke up early Thursday morning and drove 30 minutes to head to a Turkey Trot. My husband and I ran our first 5K run together! I had trained but switching jobs to something with a longer commute + the end of daylight savings time really cut into the hours I could run in a day. The race was hard, lots of hills in a mall parking area but in the end I finished and ran the whole way. My husband stayed by my side (even though he’s a much faster runner) and I shaved over 4 minutes off my previous best.

5k route

After the run I cleaned up a bit and then headed to Thanksgiving lunch with my in-laws. She had turkey, dinner rolls, sausage stuffing, cranberry sauce, and mashed potatoes. My sisters-in-law each made desserts and I brought a very empty stomach. I definitely didn’t leave with an empty one though. I didn’t take pictures because I was devouring but I did want to share my mother-in-law’s pretty centerpiece.

fall centerpiece

After a filling lunch, Dan and I then headed over to my parents’ house. Luckily our house is about 10 minutes away from each of their houses and they live about 10 minutes away from each other. Unluckily that did not allow a lot of time to digest. We had a deep-fried turkey that my dad fried, my mom tried out my sweet potato recipe, there were at least 2 casseroles, a jello salad (a true must), and a Thanksgiving miracle occurred when my baby brother tried and liked my cornbread dressing. We ate on my great great grandma’s china that my mom was just given.

thanksgiving day

That was all in one day!

The rest of my weekend was spent on a project I highly regret starting. Remember: when your husband says “Do you want to start on the fireplace or just put up the Christmas tree?” choose wisely. I was desperate to start on a makeover of the ugliest fireplace ever. I did not realize I would be dealing with moving furniture, flying debris, dust, 3 extra loads of laundry, eating on my bed, buying new tools, and realizing public enemy #1 is my former homeowner. We also checked our residential roofing system to make sure it’s in good shape and ready to take a beating in the worsening winter weeks ahead. My husband also took care of the exterior plumbing to prevent them from freezing.

fireplace horrors

Has your past homeowner ever done anything to deserve a public shaming? Uncle Albert sure does. Letting someone set tile in concrete and using concrete as a grout is the.worst.idea.ever. There are not enough evers in a Taylor Swift song to cover the amount of worst idea evers in this situation.

I know this sounds like a busy weekend but I promise you I slept in till 10 AM, ate chili dogs, and watched The Walking Dead. I also caught up on giving my puppy some extra loving and I did not do a bit of shopping all weekend. It was bliss! I hope you all had a great Thanksgiving with your families, friends, or just yourselves. I’d love to hear about how you do Thanksgiving your style.

Posted in Food, Home Renovation, Life | Tagged , , , | Leave a comment

Marbleized Christmas Ornaments

marbleized ornaments

I’m sure all you Pinterest junkies have seen this tutorial on how to make marbleized nail polish designs.

When I was making my Christmas ornaments, I wondered if this would be possible to adapt onto the ornaments using paint. Sadly my acrylic paint was a major fail so I decided to go a little crazy and just try out some nail polish to see what would happen. My first experiment came out a little blah but it definitely showed promise. I rewatched the Youtube video and remembered to help spread my first drop of polish out a few inches and then gave it another shot.

marble water

You’ll want to start with a plastic container filled halfway up with water and at least 2 shades of nail polish. The key here is to drop 2-3 drops in the center of your last circle. I alternated a drugstore red shade and gold shade, dropping each in the center of the last drops. The next step is to dip your ornament into the center of your marble pattern. I dipped the ornament’s bottom in not realizing it wouldn’t be very visible that way. Try instead to dip the side of your ornament in.

dipping marble ornament

The polish will “catch” on your ornament and will stick to the curve of the design.

dipping marble ornament

Depending on how you pattern your water design (this one had 3 separate circles inside of one big circle) you will end up with ornaments that can look similar or completely different.

marbleized ornaments

I love how these came out. If you screw up, the effect is abstract so you can just pretend it was part of the look you were going for. These were the most complicated ornaments I made and also one of the most forgiving. I’d love to see these in different colors and designs and I’m already thinking I might have to go pick up some turquoise nail polish for my peacock-themed tree I do each year.

Pin It
Posted in DIY Projects | Tagged , , , , | 1 Comment

Snowman Ornament

This year I wanted to challenge myself to create 5 different types of ornaments from those clear glass ornaments you can find at craft stores. I spent this past weekend trying to be creative and think of some new ideas. I wouldn’t normally share Christmas projects before Thanksgiving but I know Black Friday will have some deals at Michaels and other craft stores so I wanted to share some ideas with you before you hit the sales.

snowman ornament

Today’s idea is one perfect for having your grade school aged kids help you put together. Just fill a clear glass ornament with some fake snow. You might want to use a funnel to help pack it in. Set up some black and orange craft paint and let the kids go wild painting on a carrot nose and some eyes and a mouth made out of “coal”. Your end result will look something like this.

snowman ornament

It’s an easy way to dress up some ornaments. I’ll be sharing some more ideas for jazzing up clear ornaments over the next week or so. They’ll vary in difficulty so you can find a style at every skill level.

Related Posts Plugin for WordPress, Blogger...Pin It
Posted in DIY Projects | Tagged , , , , | 1 Comment