Chicken and Dumplings

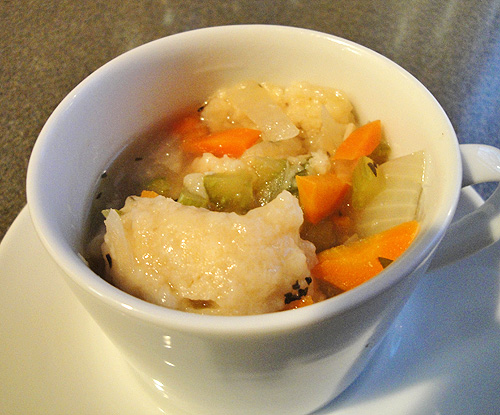
There seems to be two camps when it comes to chicken and dumplings. The northerners love a dumpling that is more ball-shaped and is light and fluffy and the sauce is broth-based. The southerners love a dumpling that is more biscuit and chewy while the sauce is more of a gravy. Living in Missouri my life has always been a mix of northern and southern traditions so chicken and dumplings are always a hot topic. The average southern style is always better than the average northern style but the best northern style will ALWAYS beat the best southern style. That’s just how it is for me.

chicken and dumplings

Thankfully, this recipe is one of those best northern style chicken and dumpling recipes. Pam from For the Love of Cooking has tweaked a Cooking Light recipe to be amazing. She even understands my irrational hatred of rosemary and uses basil as her herb of choice. Rather than repost her recipe I want Pam to have all the credit so if you need to try some of the best northern chicken and dumplings out there, try Pam’s Chicken and Basil Dumplings.

How about you? What’s your favorite style of chicken and dumplings? I’d love to be convinced by your recipes.

Pin It
Posted in Food | Tagged , , , | 2 Comments

Magic Onions

I’m sure many of you have seen the pin on Pinterest about the magic regrowing onions. You know, this one:


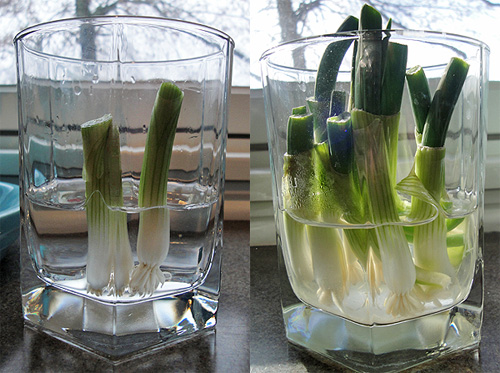
I’ve seen a lot of pins that end up being too good to be true so I wanted to test this one and see how good it was. So after I used up the entire tops of some green onions making a meal for the Chinese New Year, I popped the bulbs into a glass and added a cup of water. I wasn’t a believer but they were just going to end up in the trash so why not try?

I woke up the next morning and gave it a look. WOW! That was just 12 hours and my onions were already shooting up. It took about 7 days but they were right back to the old height.

Some Tips

  • Change the water daily. It will start to stink fast.
  • After 14 days if you still haven’t used the onions then place them in a plastic bag in your fridge so they don’t get out of control.
  • You can reuse the bulbs multiple times. The bulbs do get fatter so just cut a bulb in half if it gets too big.

Onions don’t cost a ton but I save the most on time, I don’t find myself needing to run to the store for a single ingredient when I can grow it in my Missouri kitchen in the middle of winter.

Pin It
Posted in Food, Household | Tagged , | 8 Comments

Inspired by Provence

I’ve been looking at photos of Provence, France lately and I’ve fallen in love with the beautiful fields of lavender. How could you not fall in love with a countryside that looks like this?

Provence Lavender

A Lavender Sunset

abbey of senanque

So to bring the inspiration back home, I bring you this inspiration board.

provence design

Lavender Swoop Arm Tufted Chair Target $303.99

French Herb Wreath Viva Terra $69

Mikasa Lavender Lane 4-piece Place Setting Amazon $77.99

Lavender Field Print Etsy Artist GWENSART $12

Puckering Duvet Set Target $69.99

What other countries would you like to see some travel-inspired design for?

Pin It
Posted in Household | Tagged , , , | Leave a comment

Chocolate Covered Cherry Cupcakes

This all started before I knew what I was making. My local grocery store was having a 10/$10 sale on cake mixes and I was feeling kind of froggy so I bought a few to experiment with. The first creation was my Funfetti Doughnuts. For Valentine’s Day I wanted something simple. My husband’s birthday is the week before so we were a little overwhelmed with all the chocolate cake we’d had leftover. Valentine’s called for something lighter on our stomachs and something that looked like it took far more work than it did.

Enter chocolate covered cherry cupcakes.

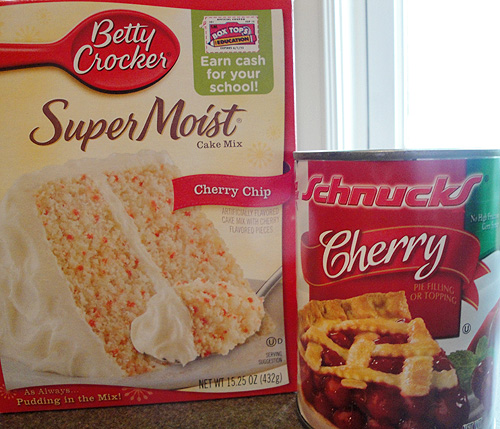
I started with a cherry chip cake mix and all the ingredients it usually called for. Then I threw in some cherry pie filling to really bring home that cherry feeling. After baking you might notice that your tops will fall slightly as they cool. This is actually good because it forms a little holder for the icing of choice: chocolate ganache. You want to plop just enough ganache on each cupcake to fit in the depressed space. Once you ice all the cupcakes, take some cherries (or cheat like me and use some leftover from amaretto sours), dip them in chocolate and plop them on the cupcakes.

Now comes the hard part: you have to wait 2 hours to let the ganache harden enough to eat them. Still, it’s worth it. The cupcake itself is sweet so the chocolate ganache on top is just bittersweet enough to remind you of an actual chocolate-covered cherry without being too rich. They’re super simple so you can make one tonight and it will be ready for dessert tomorrow.

Continue reading

Pin It
Posted in Food | Tagged , , , | Leave a comment

Meat Lovers Stromboli

3 meat stromboli

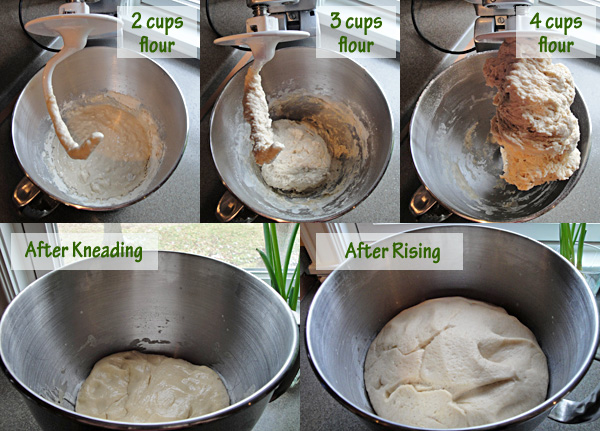
You might know stromboli by its other identity of calzone but I like to think there’s a difference so I feel special saying “STROMBOLI!” in my horrible fake-Italian accent. This Meat Lovers Stromboli (or do I have to call it Stromboli for people who love meat?) follows some very simple steps that you’ll be used to seeing in my pizza recipe. Some key tools that make it easier include a Kitchenaid mixer with its dough hook and my favorite Pampered Chef Stoneware piece. The dough in my photo below is after my first rise. I had to run some errands and it got a little out of control so I punched it down and let it rise a little more.

stromboli dough

This recipe is cheesy awesome goodness with ham, bacon, and pepperoni. If you’re the kind of person who likes pizza crust, every bite of this dish includes crispy dough with a bite of pizza filling. One bite is all it will take to make you a believer in stromboli. One bite.

stromboli toppings

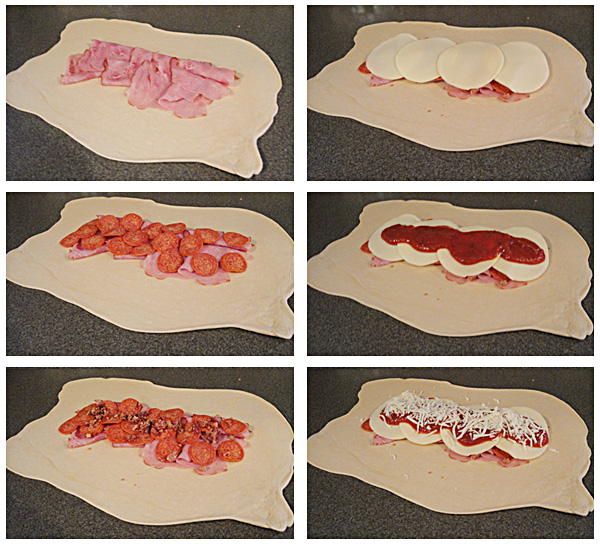
The key to stromboli is wrapping it up like a burrito. You fold in the little edges first, then the big ones, then seal it nice and tight with your fingers and some olive oil before flipping it onto your baking sheet seam-side down. Even with all that mine leaked a touch but I just scooped the cheesy goodness right off the tray and chowed down.

Meat Lovers Stromboli

Prep Time: 1 hour, 20 minutes

Cook Time: 20 minutes

Total Time: 1 hour, 40 minutes

Yield: 1 loaf

Serving Size: 2 slices

A delicious stromboli recipe. The dough is 2 servings so freeze one half or double the ingredients to serve more people.

Ingredients

    Dough:
  • 2 1/4 teaspoons active dry yeast (1 packet)
  • 1 1/3 cups warm water (110° to 115°)
  • 1/4 cup vegetable oil
  • 1/2 tsp salt
  • 4 to 5 cups flour
  • 1 Tablespoon olive oil
  • Filling
  • 1/4 lb ham slices
  • 1/2 pack of pepperoni
  • 1/3 cup crumbled bacon
  • 4 slices provolone cheese
  • 1/4 cup tomato sauce
  • 1/2 cup shredded mozzarella cheese
  • olive oil
  • 1/2 tablespoon Italian seasonings

Instructions

    Dough:
  1. In Kitchenaid mixer bowl dissolve yeast in the warm water.
  2. Add oil, salt, and 2 cups of flour. Use the dough hook attachment to begin blending together. Slowly add in 2 more cups of flour 1 cup at a time. If the dough looks too wet, add in the remaining cup of flour 1/4 cup at a time until the dough looks blended but not crumbly or sticky.
  3. Continue to knead dough on low until smooth and elastic, about 8-10 minutes.
  4. Unhook the bowl, coat your dough in a tablespoon of olive oil. Cover and let rise in a warm spot for an hour.
  5. Punch dough down. Divide in two and freeze or save the second half for another project.
  6. Stromboli:
  7. Roll out remaining dough into a 10 x 12 rectangle. Keep it about 1/4-1/2 inch thick.
  8. In the middle of the dough, add toppings, first ham, then pepperoni, then bacon, then cheese slices, then sauce, then shredded cheese. Make sure to leave space around all the edges.
  9. Fold the two shorter edges towards the center, just covering the toppings. Fold one long edge over, then cover with the other long edge, like a burrito. Use olive oil to help firmly seal all the seams.
  10. Grease baking pan with olive oil and place stromboli seam-side down onto the pan. Coat the top of the stromboli with a little olive oil and sprinkle on Italian seasonings.
  11. Bake at 400°F for 20-25 minutes or until golden. Cool 5 minutes, cut into 1 inch slices, and serve
http://www.thehyperhouse.com/2012/02/meat-lovers-stromboli/

Pin It
Posted in Food | Tagged , , , , , | 1 Comment

7 New Ways To Use Pinterest

With Facebook and Pinterest connecting even more these days, there have been a ton of new Pinterest users coming online and wondering what the heck is Pinterest. In a way I’m glad I joined over a year ago so I could figure out all the fun ways to use it without anyone I knew watching me. (BTW- you can find me on Pinterest here) Now it seems like everyone is online using it so if you’re clueless we all get to see it. Here’s some tips to help the Pinterest newbies and even some tricks that experienced users might want to try.

1. Stop Sharing It All on Facebook

Pinterest being linked to Facebook makes it easy to find friends but how annoying is it when you see 12 updates on your Facebook feed because someone just discovered cute puppy photos? Don’t be that friend, the one who doesn’t realize they’re annoying everyone on Facebook when all you need to do is uncheck some buttons.

Log into Pinterest and go to your Settings page. Feel free to link your Pinterest page to your Facebook page but by toggling off “Add Pinterest to Facebook timeline” you’re one step closer to making your Facebook friends happier.
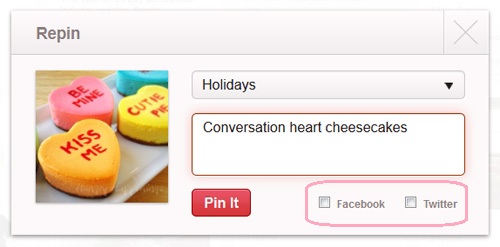
Now get ready to repin something. Anything. When you see the popup, make sure neither the facebook or twitter boxes are checked. Then you’re good to go!

2. Edit Your Profile

First up, I hear so many people complaining when they get new friends because then they get lots of emails every time their pins get repinned. You probably already spend time on pinterest and can view which pins of yours get repinned by viewing your pins page – http://www.pinterest.com/YOURUSERNAME/pins (so mine is http://pinterest.com/julieannie0729/pins/ or you can see the page here) so turn those pinterest emails off!

If you linked up Facebook and Pinterest then your first and last name are right on your Pinterest page. That might be fine with you now but if you want some anonymity then you can change your first or last name right from your settings page. Change any other info you want on this page, including your photo. You can add your website, a bio, a location, link your twitter page, or even your facebook page. They all end up displayed on your main pinterest page like so. My website is represented with a globe and my twitter and facebook pages are linked as well.

3. Pin It!

When I helped my mom sign up for Pinterest, I noticed she was clicking “Add” and then “Add a Pin” every time she found something new on the web. Go to the Pinterest Goodies page and just drag that Pin It button right up to your toolbar. There’s some additional info needed for Chrome so check out the page for instructions.

4. Pin the Post (Not a Blog)

I often see a really neat pin, click it to view the webpage and discover that the original pinner pinned it from their RSS feed or the front page of the website. That means a lot of searching to find that really awesome DIY project I wanted to try. Always click the title of the post you’re on to make sure you’re pinning the right part of the website. If you see something like “http://www.thehyperhouse.com/” You haven’t gone deep enough. Make sure there’s more after the slash, like this one is “http://www.thehyperhouse.com/2012/02/7-new-ways-to-use-pinterest/” which means you can pin this page and anyone who clicks on it will be brought right to this post.


5. Keep a 5:1 ratio

It’s really fun to discover new projects on Pinterest, right? But I’m sure you have had times when you’re browsing and you see the same dang smoothie recipe for the 100th time. I think anyone on Pinterest last fall remembers the super simple pumpkin cupcake recipe that wouldn’t die. If you’re just clicking repin on pinterest, you’re missing out on half the fun. You should try making your own creations or finding ideas from your favorite websites and pinning that new idea. Try to pin 1 new idea for every 5 repins to help keep Pinterest fresh.

6. Clear out your Bookmarks
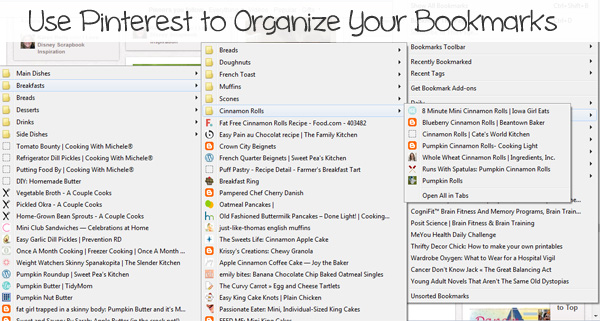
Do you have tons of items bookmarked in your browser but never go to them? As you can see, it used to be impossible for me to find any recipes. I’m a visual person so seeing all my ideas in a Pinterest board means I’m more likely to cook the recipes instead of just meaning to. I just load my bookmarked page, pin it to a board, and then delete the bookmark. Spend 5-10 minutes a day clearing out your bookmarks and you’ll have a head start on your 5:1 ratio too.

7. Clear Out Your Folders

Let’s be honest, Pinterest appeals to most of us because we’re the type of people who had inspiration folders all over our computers. I had some leftover from my wedding, ideas for home renovation, even just funny photos making fun of the first Twilight movie. It was bad. I also had no idea where most of those photos came from and I don’t want to upload ideas to Pinterest without giving credit to the original creator.

Enter Google Images. You can drag and drop images from your computer right into the search field and it hunts down the original source for you. The results are amazingly accurate.
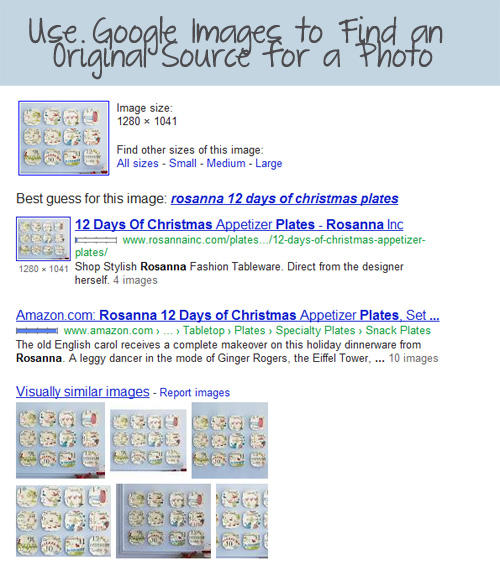
It not only knew from my photo that the images were plates but it also knew they were 12 days of Christmas plates, made by Rosanna, where they were online to buy, and other images cropped from the same image I had uploaded. When you use it for pinterest, just drag and drop your inspiration photo and look for the original source or a page that gives credit to the original source. Giving credit on Pinterest is always a good idea.

Like this Pinterest Post? Check out even more great Pinterest tips! Or Discuss the New Pinterest Profile.

Do you have any Pinterest secrets? Share your Pinterest account in the comments and I’ll follow you!

Pin It
Posted in Household | Tagged , | 273 Comments

Color Palettes Showdown

2 weeks ago I compared two ways to generate color palettes: DeGraeve and MyColortopia. I compared both methods to my own attempts at creating a color palette using Photoshop. Well, now a new competitor has entered the showdown: Chip It by Sherwin Williams.

chip it by sherwin williams

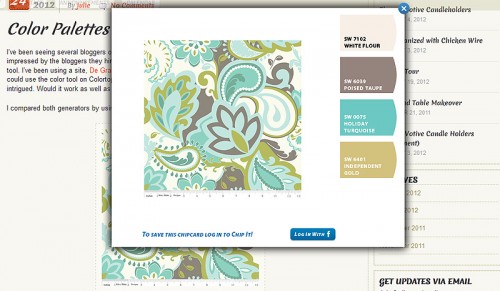
Like the other sites, you can use a website to extract a color palette from your inspiration photo. What’s really nice about it is that like MyColortopia it generates paint colors based on the photo’s colors. Chip It allows you to either directly type the URL on their main page or they have this nifty toolbar button that lets you see colors right on the webpage you are viewing. See it in action:

chip it by sherwin williams

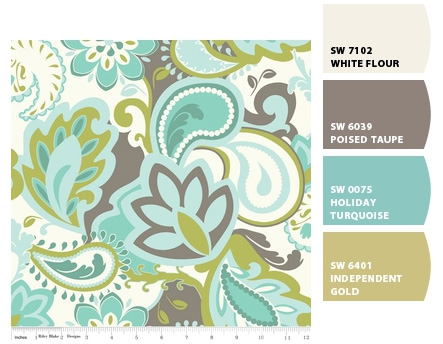
So here’s the final Sherwin Willims Chip It palette for me.

chip it by sherwin williams

I really like that it pulled colors directly from my image and assigned a paint color to them. I had also liked the blue and green look in the original image and though Chip It pulled more of a gold shade out, I have to admit the palette looks really good with it. As a reminder, here were the original palettes I generated.

compare color generators

While clearly Photoshop produced the most precise color matching, it didn’t give me a paint color and it relies on the idea of using an image with a good color palette already. Chip It seems to win in my eyes because not only does it provide a paint color match but it also makes a complete color palette. Add on the bonus Chip It toolbar method and I’m sold. Chip It is my new favorite color palette generator. If you try it, I bet you’ll be sold too.

Pin It
Posted in Household | Tagged , , | 5 Comments

Valentine’s Centerpiece

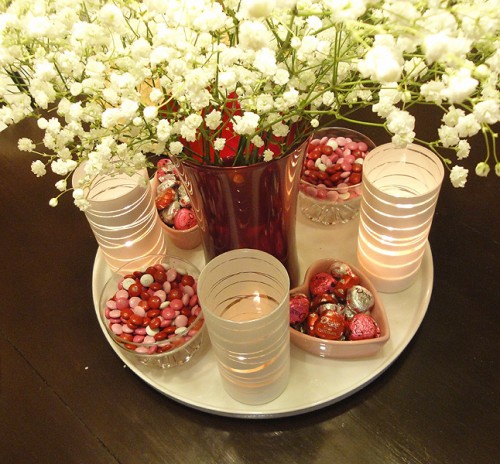
Now that I have a table and a complete dining room, I find myself wanting a monthly centerpiece. I’m still in the honeymoon phase with my dining room so consider my centerpiece the equivalent of me taking my dining room out for dinner and a movie.

February Centerpiece for Valentine's

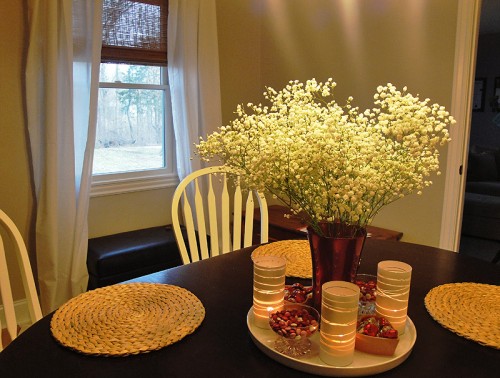
As you can see my centerpiece has some romance for Valentine’s Day. I’ve got candles, flowers, chocolates, and plenty of shiny things.

February Centerpiece

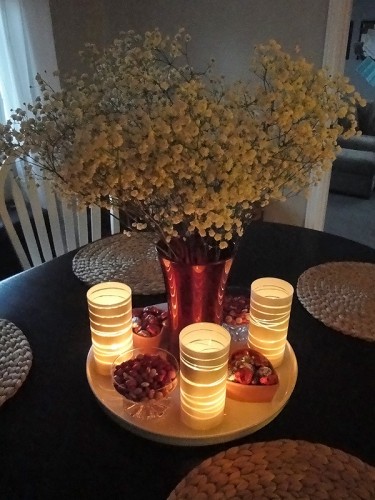
I managed to keep this centerpiece very affordable. I used some dessert dishes that the original homeowner had left in the house, a vase from a Valentine’s Day years ago, heart shaped dishes I got in Target’s Dollar spot a few years back, candle holders I made myself, a $5 bouquet of baby’s breath, and chocolates I would have bought anyway. Plus, I’ve convinced my husband that I don’t need flowers for Valentine’s Day since I bought these and that’s a savings in itself. My favorite part (other than the chocolate) is how nice it looks at night.

February Centerpiece

That’s worth the full $5 I spent right there and definitely cheaper than taking my dining room to dinner and a movie.

Pin It
Posted in Household | Tagged , , | Leave a comment

Six Signs of Spring

Happy Groundhog Day! I’m not really one to think a groundhog can predict when spring is coming but I am a little more willing to trust all my favorite stores. They can’t sell spring items unless people think spring is coming, right? Thankfully it looks like spring is coming…in 6 ways from my favorite stores.

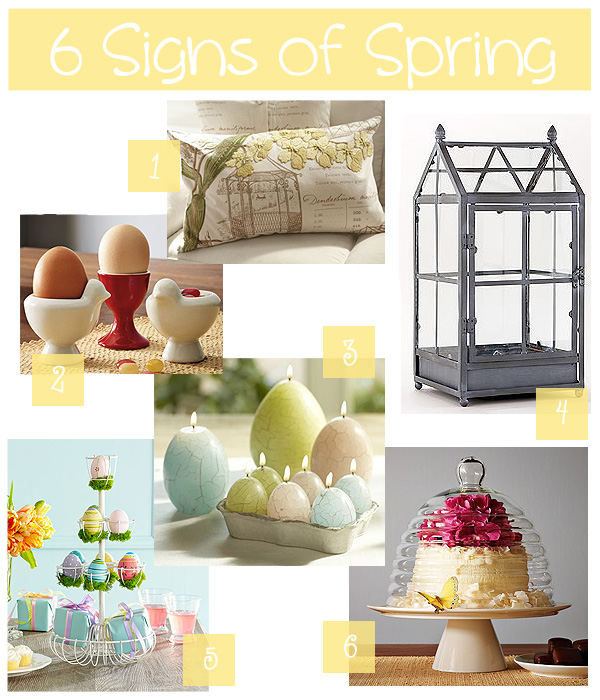
6 new items for your home this spring

1. A pretty spring pillow from Pottery Barn includes florals and artwork.

2. I’m not sure that I need egg cups but these chicken egg cups from West Elm are adorable.

3. These egg candles from Pottery Barn feature some of my favorite spring colors, pink, green, and blue. I can’t wait to see spring colors everywhere.

4. This house from World Market can be used in a million ways. Keep it full of candles for the rest of winter but the minute spring arrives use it as a terrarium. You could even use it now as a greenhouse to start your seedlings for spring.

5. This egg stand from Wisteria would make a gorgeous centerpiece or feature on a dessert table. Swap eggs for cupcakes and you can use it year-round.

6. The beehive trend is really taking over in 2012. This beehive cake stand from West Elm is the cutest beehive I’ve seen.

Pin It
Posted in Household | Tagged , | Leave a comment

Lazy Susan Makeover

Hello and welcome to my lazy susan.

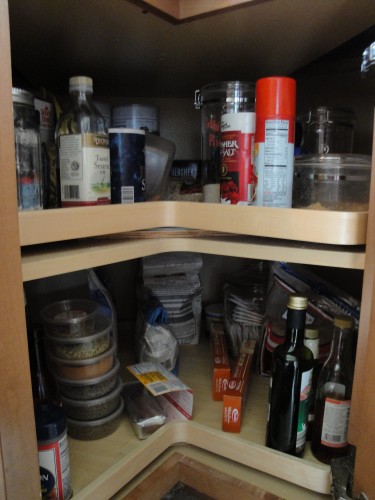
Sure it looks safe from the outside but inside it was a wild and dangerous place.

Let’s take a look at the offenses.

Poorly labeled containers with a dirty stand? Check. Giant duplicate containers? Check. Even more poorly labeled containers that could lead to a baking powder and baking soda mixup? Check. A hodge podge of spices and poorly bagged sugar? Check. A giant mess that makes it hard to find things? Check.

It was rough in there. Confession: I had never emptied it since I piled stuff in there after its installation in 2008. I empty out my pantry regularly but this area was out of control and hidden so I just never addressed it.

So I followed my simple organizing plan. I removed everything and cleaned it up. Then I consolidated any duplicates and threw out all the junk and expired goods. I started cleaning out all the containers and bought new ones to put all the bagged and boxed goods into.

I buy spices in bulk (if you’re a St. Louis local you won’t believe the deals for spices at Old Town Spice Shoppe in St. Charles, $2-$4 is how much I pay for most spice blends) so sometimes I just plop them in my lazy susan rather than putting them away (because I’m lazy). I finally put them all in the right place and refilled old containers that needed it.

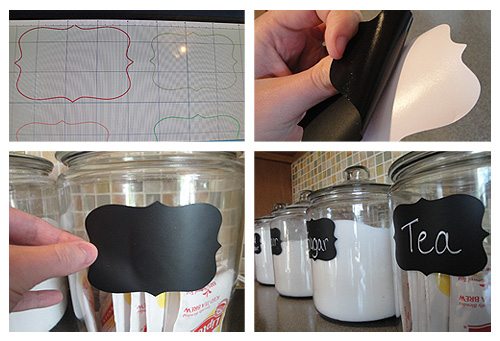
making cricut labels

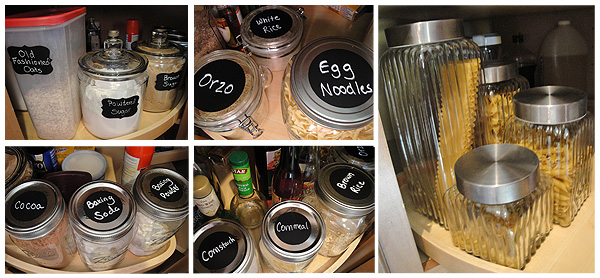
Then it was time to put everything back. I made labels using my Cricut and some chalkboard contact paper (if you don’t want to go that route try these Martha Stewart chalkboard labels from Staples). I put the items back so I spin one way to reach all my baking items and another way to reach all my cooking items. The results speak for themselves.

organized lazy susan with chalkboard labels

It took some work but it’s so much easier to spin that lazy susan now. It’s also very empty in there so I might be able to fill it up more or jest embrace a nice, accessible cabinet. The real key to this project was having plenty of jars and plenty of labels and now I don’t dread looking at 4 years of mess that had accumulated.

Related Posts Plugin for WordPress, Blogger...
Posted in Household | Tagged , , | 2 Comments