Six Signs of Spring

Happy Groundhog Day! I’m not really one to think a groundhog can predict when spring is coming but I am a little more willing to trust all my favorite stores. They can’t sell spring items unless people think spring is coming, right? Thankfully it looks like spring is coming…in 6 ways from my favorite stores.

6 new items for your home this spring

1. A pretty spring pillow from Pottery Barn includes florals and artwork.

2. I’m not sure that I need egg cups but these chicken egg cups from West Elm are adorable.

3. These egg candles from Pottery Barn feature some of my favorite spring colors, pink, green, and blue. I can’t wait to see spring colors everywhere.

4. This house from World Market can be used in a million ways. Keep it full of candles for the rest of winter but the minute spring arrives use it as a terrarium. You could even use it now as a greenhouse to start your seedlings for spring.

5. This egg stand from Wisteria would make a gorgeous centerpiece or feature on a dessert table. Swap eggs for cupcakes and you can use it year-round.

6. The beehive trend is really taking over in 2012. This beehive cake stand from West Elm is the cutest beehive I’ve seen.

Pin It
Posted in Household | Tagged , | Leave a comment

Lazy Susan Makeover

Hello and welcome to my lazy susan.

Sure it looks safe from the outside but inside it was a wild and dangerous place.

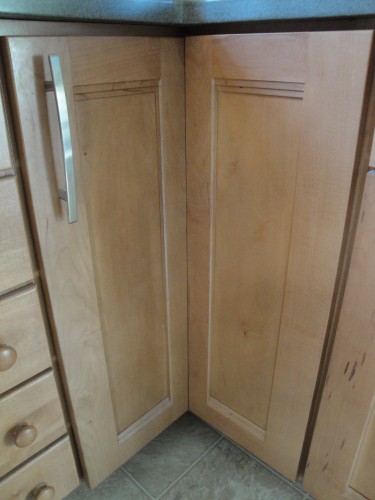
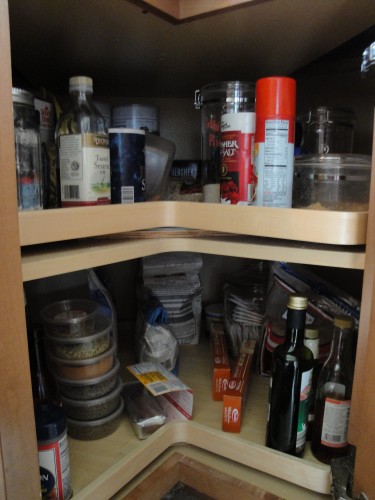
Let’s take a look at the offenses.

Poorly labeled containers with a dirty stand? Check. Giant duplicate containers? Check. Even more poorly labeled containers that could lead to a baking powder and baking soda mixup? Check. A hodge podge of spices and poorly bagged sugar? Check. A giant mess that makes it hard to find things? Check.

It was rough in there. Confession: I had never emptied it since I piled stuff in there after its installation in 2008. I empty out my pantry regularly but this area was out of control and hidden so I just never addressed it.

So I followed my simple organizing plan. I removed everything and cleaned it up. Then I consolidated any duplicates and threw out all the junk and expired goods. I started cleaning out all the containers and bought new ones to put all the bagged and boxed goods into.

I buy spices in bulk (if you’re a St. Louis local you won’t believe the deals for spices at Old Town Spice Shoppe in St. Charles, $2-$4 is how much I pay for most spice blends) so sometimes I just plop them in my lazy susan rather than putting them away (because I’m lazy). I finally put them all in the right place and refilled old containers that needed it.

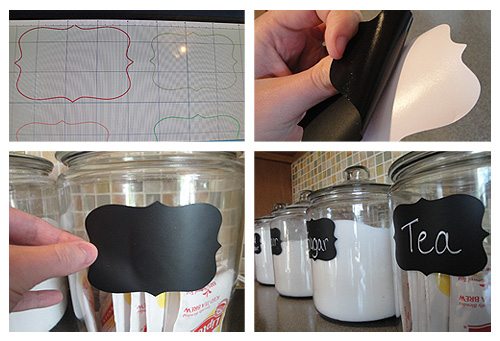
making cricut labels

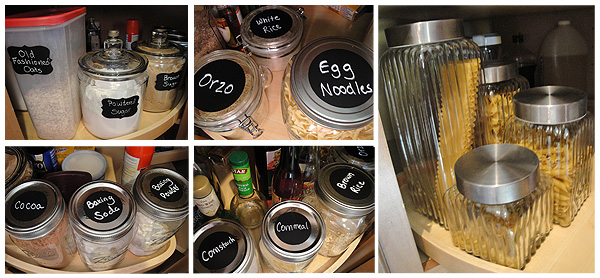
Then it was time to put everything back. I made labels using my Cricut and some chalkboard contact paper (if you don’t want to go that route try these Martha Stewart chalkboard labels from Staples). I put the items back so I spin one way to reach all my baking items and another way to reach all my cooking items. The results speak for themselves.

organized lazy susan with chalkboard labels

It took some work but it’s so much easier to spin that lazy susan now. It’s also very empty in there so I might be able to fill it up more or jest embrace a nice, accessible cabinet. The real key to this project was having plenty of jars and plenty of labels and now I don’t dread looking at 4 years of mess that had accumulated.

Posted in Household | Tagged , , | 2 Comments

Blinds Installation

For me, one of the hardest parts of finishing a room is the windows. And surprisingly, one of the easiest things I can do is fix upvc doors. I have a hard time deciding on what curtains (nevermind whether I should even have curtains or not), what roller blinds, or even what hardware I should be putting up to complement with the new residential window installation. It’s important to thoroughly research double glazing window companies. Once I’ve finally made that decision I have an impossible time with the installation of one or more parts of that because I have some serious issues following directions without words. It’s a total first world problem and yet I keep having it. With our new windows we needed new window dressings so I finally decided towels and sheets weren’t working when I saw some neighbors walking way too close to my house after I had just showered. It was time.

skuggig from ikea

The easy part actually came on my November trip to Ikea. My husband and I had found some curtain rods called Skuggig that were really easy to install and had the clean simple lines we were looking for. (update: I hear they’ve since been discontinued. Anyone know of a similar product?) We also found some simple curtains that were both sturdy and sheer, all at the same time. Ikea’s Vivan was our new curtain of choice. They came with an iron-on hem tape so we could change the length easily.

Ikea vivan

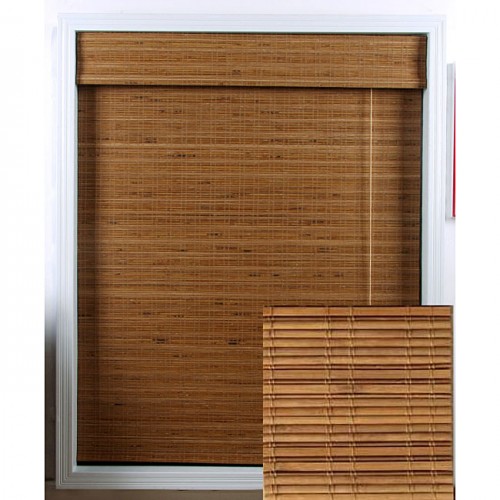
For custom window treatments, we decided we wanted a more natural look so we instantly knew we wanted bamboo roman blinds of some kind. After pricing out our options we found Overstock had the best rates. Even better, they almost always have a coupon code so all our blinds came in at less than $30 each. We went with the Tuscan Bamboo Roman Shade. The great thing about Overstock’s selection is that they have so many widths and heights that you likely won’t have to cut them down at all. It’s like having custom-made blinds for your house.

tuscan bamboo roman shades from overstock

 You may have spied the shades during the kitchen makeover. They were really easy to install. The key was to just space the base far enough outside the window and make them horizontally level. The easy-install brackets allow you just to slide the blinds back and forth until they’re evenly spaced around your window. Seriously, drill & screw, level, install, and slide- it’s that easy. Watch as my husband demonstrates. I swear he doesn’t usually coordinate his shirts to the room he is in.

how to install blinds

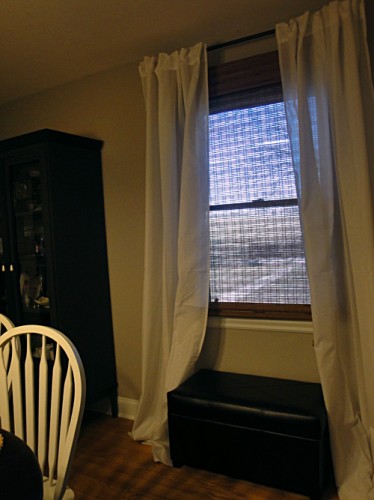
Here’s the complete look, curtains, shades, and hardware, in the dining room.

dining room with ikea curtains and overstock roman shades

I haven’t hemmed up the curtains because as you can see we’re still rearranging furniture. Despite how sheer the roman shades look when you stand outside you cannot see in. Even closed they let so much light into the house which is nice considering January has a tendency to be a very dark and cloudy month at times. If you checked out the dining room reveal you may have noticed we cheated a little. Still not sure how?

Source: curbly.com via Julie on Pinterest

We hung the curtains a little outside the window trim and also hung the blinds above the trim to give the illusion of having larger windows than we actually do. I’ve noticed our barely-8-foot ceilings seem taller now than they ever did before thanks to that tip.

We finally addressed the trouble of windows and it turned out to be a lot easier than we planned. I’m not sure why I was convinced it would be so impossible (well, except we had a lot of past failures) but everything we did here was foolproof. Do you have a habit of building up projects to be impossible tasks?

Posted in Home Renovation | Tagged , | 1 Comment

February Tasks

It’s time once again for the monthly chore chart. Most of these are taken from the amazing Get Organized Now. Every month they create a checklist of the household tasks that often slip our minds. They even offer a printable version that allows you to check back on past months in case you need to play catch up.

What I like to do is map out all the tasks that apply to me from the list and plot them on my calendar. Then I fill in the empty spots on my calendar with other tasks I have to do, like going to the eye doctor of chapel duty.

Source: etsy.com via Julie on Pinterest

Some of my top tasks for February from the checklist include:

  • February 3: Start ordering seed and landscaping catalogs. I’m a huge fan of White Flower Farm and Burpee. My husband has been gleefully drawing up plans for our outdoors. Keep that in mind when you see what I’ll be blogging about this spring/summer. You may visit sites like https://southernpalmetto.com/ to get an idea about landscaping.
  • February 7: Call an accountant or make sure you’re organizing all those tax documents. There’s some changes to the tax code so if you plan on filling out forms yourself make sure your supplier has the latest versions.
  • February 13: It’s National Clean Out Your Computer Day. I’m not sure you can tell your work you can’t come in because of this holiday but take this as a time to delete all those files you don’t need, print all those photos you do need, and make sure your machine is up-to-date on antivirus software.
  • February 19: Time to start planning those summer vacations! Check out my travel site TravelHyper for ideas. I have $500 and $1000 trips so you don’t break the bank. With tax time you should look at your budget and see what you can afford.
  • February 21: Make a big feast for Fat Tuesday.
  • February 26: Work on repairs. Need some home repairs? Consider hiring professional handyman services to come out and fix things up before they get busy in the spring. This is also a great time to schedule professional plumbers for a drain cleaning service to avoid frequent clogging in your pipes. They have access to tools such as Pipe Test Equipment that allows them to thoroughly test pipes and drains in order to more effectively locate the issue.

What’s your must-do task for February?

Posted in Household | Tagged | Leave a comment

Fun with Funfetti


I’m having a bit of an obsession with buttermilk lately. Combine that with my love of my doughnut pan and doctoring cake mixes and this recipe is like my soul mate. So what’s all my fuss about? Funfetti Doughnuts.

Oh yeah, I went there.

Cookies & Cups tipped me off to this amazing recipe. You need most of a box of cake mix, some buttermilk, eggs, and a touch of melted butter. That’s it! Okay, so you’ll also need a doughnut pan (or you could steal one from your mom) so you can enjoy the baked doughnut goodness. This recipe filled up both a 6 regular-sized doughnut pan and a 12 mini-sized doughnut pan.

Just snip the corner of a Ziplock bag and fill up your pans. The full recipe and cooking instructions are below. I added a glaze to the doughnuts but they are sweet enough without them. My husband commented that they taste like angel food cake and even though he’s more of a Krispy Kreme kind of guy he gave these his seal of approval. Then he went back for seconds.

Baked Funfetti Doughnuts

Prep Time: 5 minutes

Cook Time: 10 minutes

Total Time: 15 minutes

Yield: 12 doughnuts

Serving Size: 1 doughnut

Ingredients

  • 2 3/4 cups Funfetti Cake Mix (less than 1 box)
  • 3/4 cup buttermilk
  • 2 eggs
  • 2 tablespoons melted butter

Instructions

  1. Stir the ingredients together until just mixed.
  2. Transfer batter into a Ziplock bag and squeeze into a buttered and floured doughnut pan.
  3. Bake at 425°F for 8-10 minutes or until lightly browned.
  4. Cool in pan for 5 minutes and then use a knife to gently remove doughnuts from the pan.
  5. Top with a glaze or even funfetti frosting for extra flavor.

https://www.thehyperhouse.com/2012/01/fun-with-funfetti/

Pin It

Posted in Food | Tagged , , , | 2 Comments

Valentine’s Ideas

I went to Target over the weekend and went immediately to the Target Dollar Spot. I have a small problem with that section meaning I spend 1/4 of my life in it. I found some fun items I immediately thought would be perfect for a Valentine’s DIY project.

I saw this mug in Target’s Dollar Spot for $2.50. My mind immediately saw several cute projects I’ve seen pinned on Pinterest.


These mugs remind me of some I have from Anthropolgie. Just buy a Porcelaine Paint Marker and draw the design on yourself. I’ve seen pens like this at Michaels too. You could spell out “L-O-V-E” or I love the idea of his and her mugs for Valentine’s Day.


Speaking of His & Her mugs, aren’t these cute? I’m a little over mustaches in art but these mugs would be cute for me and my husband since he actually has a mustache (and beard) going for him.

Other cute ideas I love include writing a favorite love quote, lyrics from a special song, or even drawing the skyline of the city you met on your mug. Stuff your mug full of gifts from someone you love or use it to serve up some breakfast in bed.

The other item that caught my eye in the Target Dollar Spot was this silicone tray. It’s also $2.50.

Target calls it a muffin tray so the obvious choice for it is making muffins. But I thought, why not pie?


Heart shaped pies? I’m there. You could even go savory and make mini-heart-shaped pizza pies. My favorite idea isn’t as edible.


If you have kids, what better way to combine holidays and clean-up than with these recycled heart crayons? It’s so practical and you can make all those little pieces become new again.

I’m going cheap for Valentine’s this year so I was thrilled to see such cute finds. I still need to check out the local dollar store to see how well I can do there. Have you managed to dig up any finds in Target’s Dollar Spot or anywhere else thrifty lately?

Posted in DIY Projects | Tagged , , , , | Leave a comment

Color Palettes

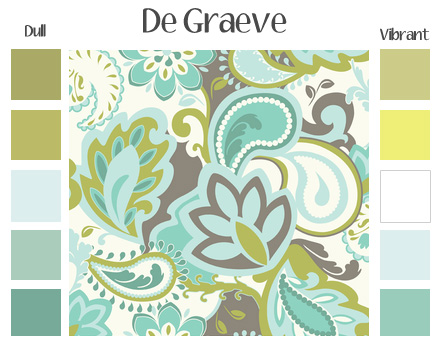
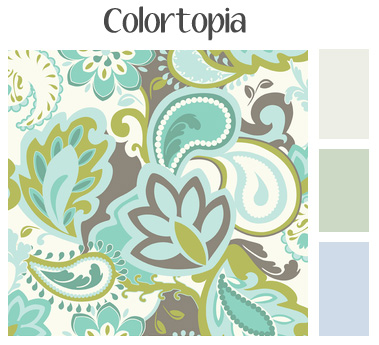
I’ve been seeing several bloggers out there talking about Colortopia so I decided to check it out for myself. I was impressed by the bloggers they hired to write the My Colortopia blog. What really impressed me was the color tool. I’ve been using a site, De Graeve to come up with color palettes based on pretty photos. When I discovered I could use the color tool on Colortopia to come up with color palettes and their matching Glidden paint colors, I was intrigued. Would it work as well as my usual color palette generator?

I compared both generators by using the same photo, a color sample from Emily Taylor’s Verona in Teal.

Tip: If you find an image you like on oh, say Pinterest, right click and choose “Copy Image Location” in Firefox or “Copy Image URL” in chrome and paste it into the De Graeve “URL of image” field. I did this and De Graeve popped out two color palettes, one dull and one vibrant.

I think De Graeve a good job finding the colors used in my inspiration photo but it only gives me the hex color codes. That makes it helpful for webdesign but it’s hard to translate into a room. It also didn’t find that shade of gray that I really loved in the photo.

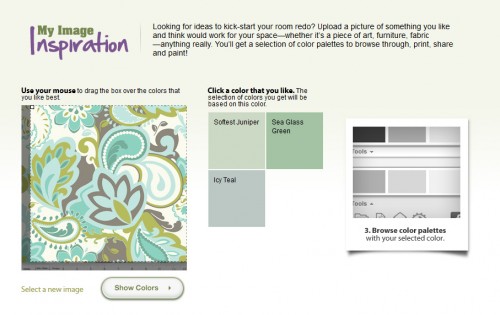
So I tried the Colortopia color tool. Instead of trying to find all the colors in the image, it extracts the top colors, like so:

Then you can choose the color you want to base your palette around. I chose “Softest Juniper” and it gave me a palette using it, “Softest White” and “Cornflower Bouquet”.

The colors don’t match exactly but they do give you a paint color name which I find very helpful. It generates a palette based on one color inside the inspiration photo, which is nice if you only like one color but it limits you if you like the photo as a whole.

Both tools have their strengths and weaknesses. I still tend to favor De Graeve simply for the number of color matches it is able to find. If you use a more complex image, you might find Colortopia extracts the individual shades better. Here would be my ideal palette that I made by pulling the photo colors out in photoshop.

That would take more time and still doesn’t generate paint colors but it’s also more precise. Do you have a speedy or smart way to create color palettes or choose paint colors? I’d love to hear them.

Pin It

Posted in Household | Tagged , , | 1 Comment

Favorite Floral Rugs

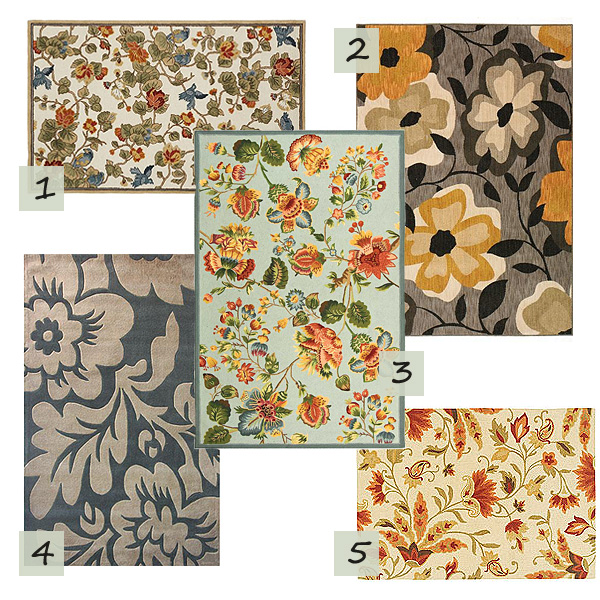
A little while ago I showed off my top 5 favorite patterned rugs. If you’re more of a floral lover, you’ll love today’s top 5 floral rugs. Some are more traditional while others have a more contemporary flair.

Sources

  1. Bird Floral Rug, Pottery Barn. 8×10, $599. Other sizes available.
  2. The Flourish III Area Rug in grey, Home Decorators Collection. 7’8″×10’10”, $749. Other sizes and colors available.
  3. Hand-Hooked Oasis Wool Rug in light blue, Overstock. 7’9″×9’9″, $335.99. Other sizes and colors available.
  4. Hand-tufted Alexa Pino Collection Floral Rug in slate, Overstock. 7’6″x9’6″, $273.99. Other sizes and colors available.
  5. Floral Sunset Tufted Rug, Pier 1. 5×7, $199.98.

Pin It

Posted in Household | Tagged | 1 Comment

Kitchen Tour

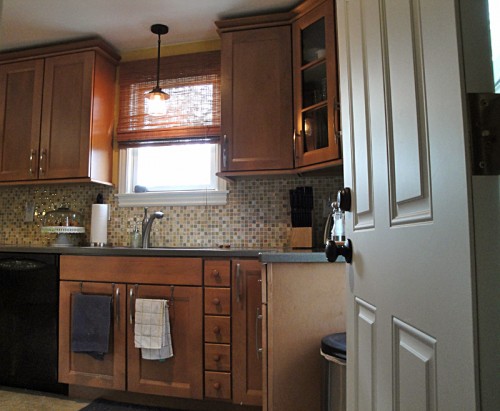
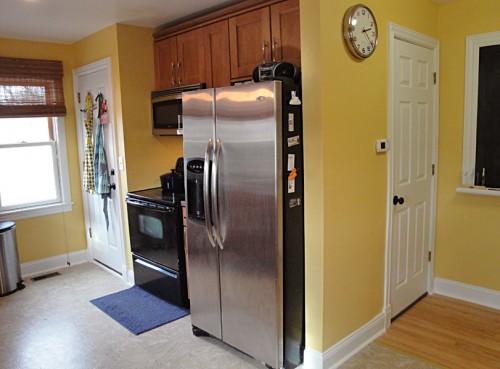
So remember that scary kitchen? Or maybe the blue one we lived with? Here’s the end result of all the work my husband and I did:

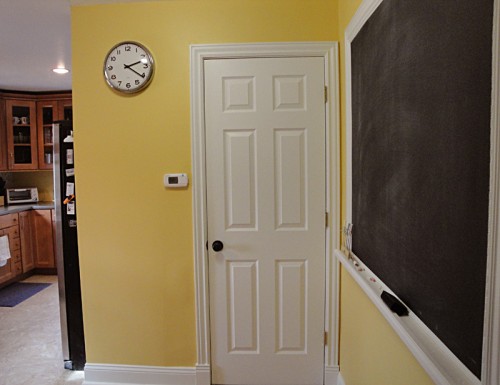
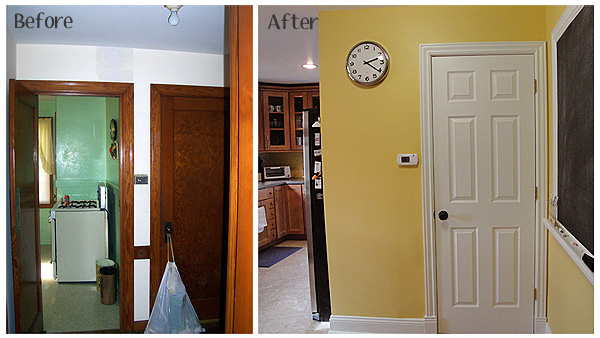
Walking into the kitchen you now see the new door leading up to the attic and the chalkboard my husband built from scratch.

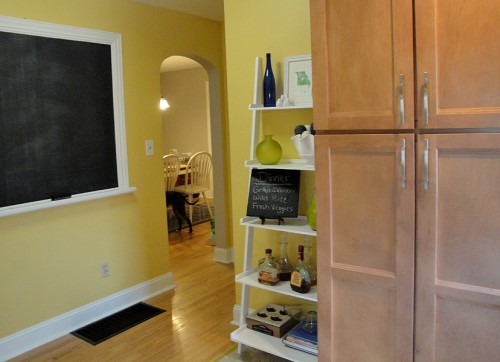
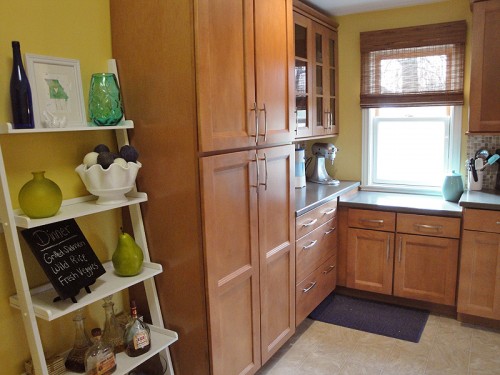
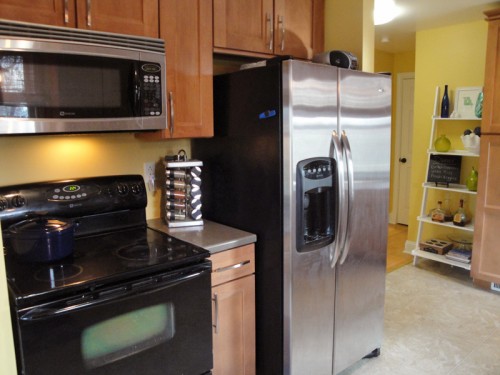
Here’s the way you just came from leading back into the dining room. That ladder bookshelf and the commercial wash down taps we recently added are my favorite things.

Here’s another shot of it along with the pantry and my little baker’s nook. Can you believe all of this used to be in the bathroom of the house?

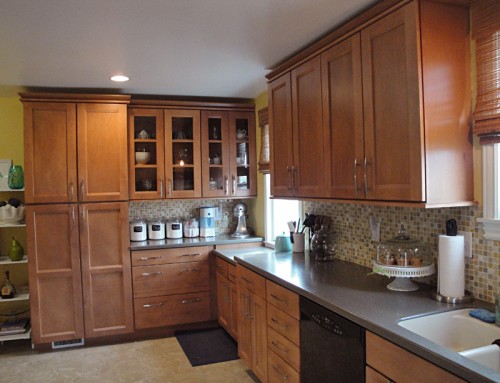
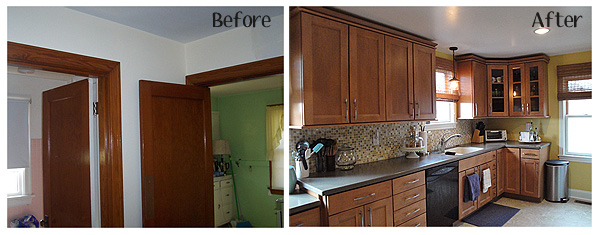
Here’s another shot of the nook with a glimpse at the full row of cabinets. I use those tiny little stacked drawers to hold all my spices and they fit amazingly well thanks to the job done by the kitchen renovators.

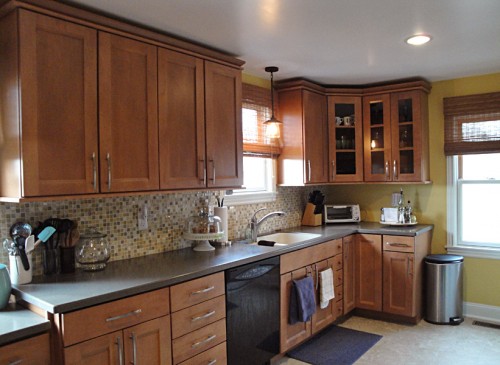
Here’s a shot into the corner where we have a few more glass front cabinets.

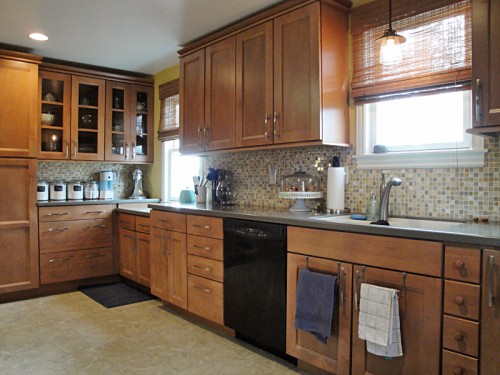
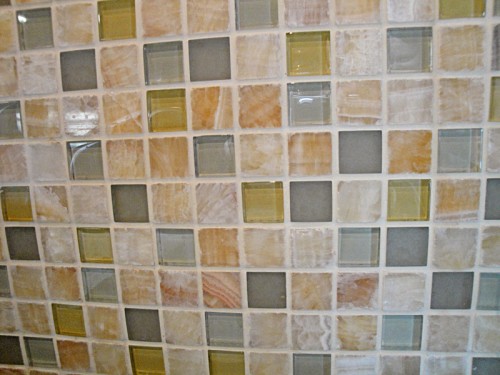
This shot shows off the schoolhouse light we bought a few months ago from Lowe’s and the tile. Here’s a detailed tile shot. We were also skeptical of having granite countertops but at the end decided to install them and we love it; you should try it now if you are doing a kitchen renovation.

Countertops and custom tile installation can add so much to the decor of a kitchen and bathroom. They can coordinate with walls, laminate flooring, and decorative items, and they can convey the mood you seek to create in your home. Rather than choosing generic counters, consider installing custom ones that perfectly meet your needs. Here are just a few reasons why you should opt for custom countertops, see some ideas at https://www.signatureworktops.co.uk/caesarstoneworktops/.

It’s from Home Depot and so incredibly amazing looking.

Remember how we built a nook where a door once was? This shows off the new layout pretty well.

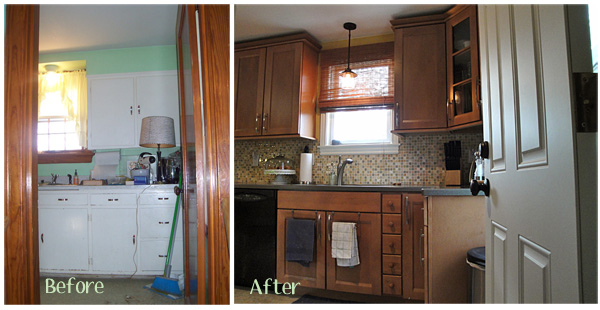
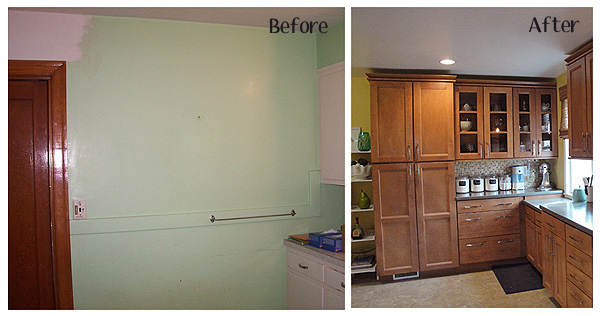
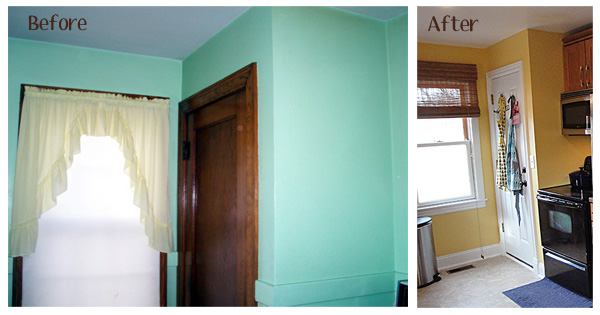
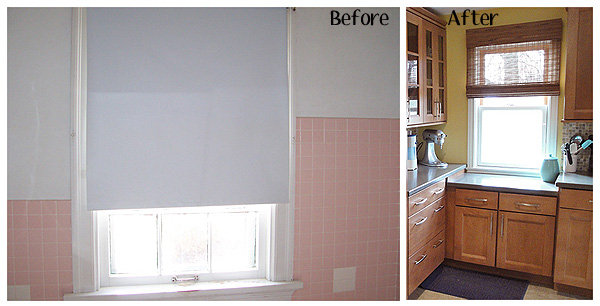
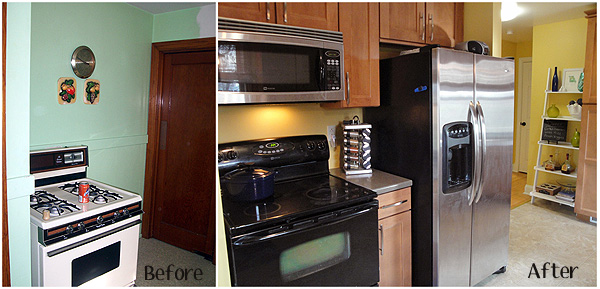
We still have some very minor things to touch-up in this room but we’ve hit the 95% mark so I think that my husband and I did amazingly well so far. Here’s some before and after shots. Check them out while listening to Sarah McLachlan’s “I Will Remember You” for an authentic experience.

It’s been a few years, a ton of work, a chunk of change, lots of yelling, lots of love, but it all came together. You can’t believe how wonderful it is to cook a meal in such a beautiful and organized space and knowing how much I did and my husband did with our two hands (along with those of family and friends). I just feel so proud of this space. The rest of our home has quite a ways to go but I really believe we’re on the right path and some day all the rooms will look this good.

Linking up to Thrifty Decor Chick’s Show Us Your Kitchens! link party.

Posted in Home Renovation | Tagged , , , | 9 Comments

Beginning to Take Shape

 You saw the kitchen before and the demolition, now here’s the process we went through to turn it into a useful room.

When it came time to order cabinets, one look stuck in our minds. We had seen it while collecting brochures and this one in particular came from Home Depot.
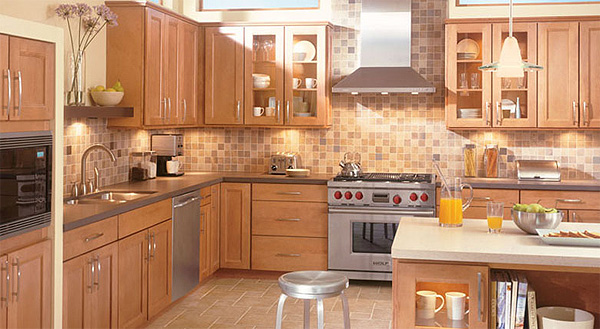
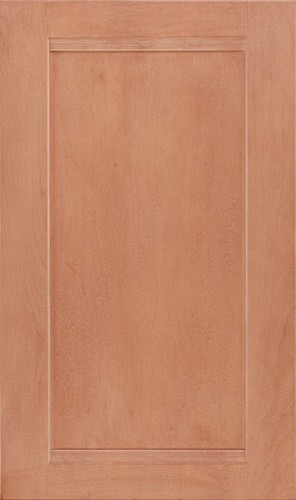
It was everything our first kitchen wasn’t: bright, airy, and open. Obviously we weren’t going to be able to replicate the entire look but we knew that those were the cabinets we wanted. We loved the simple modern lines but the classic Shaker style of the cabinets. The name of the cabinets were Del Ray in Maple Spice from Woodmark Cabinetry, available at Home Depot. Another shot:
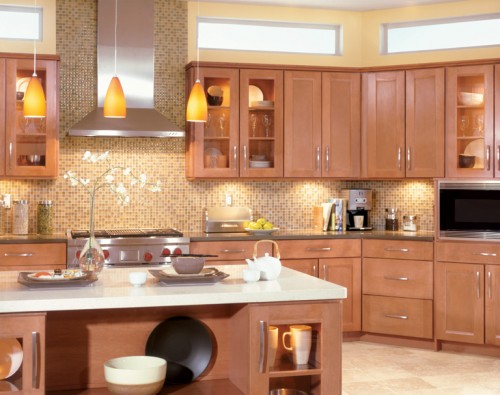
Virtually the same kitchen, just with different tile. Check out the detailing on the doors:
When you get cabinets installed, you might be surprised how long it takes for the actual installation to begin. First you have a consult where you schedule the measurement and discuss your basic budget and cost to renovate kitchen. Then a contractor comes to your home to measure the space from walls to windows, outlets to doors. Then you meet with your consultant again and plan out your space. We started by discussing our preferred cabinet design, placing the appliances and sink, and building cabinets around those needs. From there we talked countertops, sinks, faucets, and the ordering process. We sat on it for a few days, then placed our order. That was about a 10-day process in itself.

After that we had the long process of waiting. When the cabinets arrived they had to be inspected for defects before they could be installed. The installation took only about 3 days but we ran into an issue where one cabinet was the wrong size (but not defective so it was missed in the inspection) so they had to reorder it. While we waited we bought handles but the downside was that our counters would be delayed until the new cabinet arrived and could be installed. Finally the new cabinet arrived and we could schedule our countertop measure. Another 10 days from the measure and we got our counters in. It took over 2 months from start to finish while we lived with just a laundry sink, a stove, a fridge, and a card table as a counter. Be prepared to rough it folks. But here was the result of all the wait:
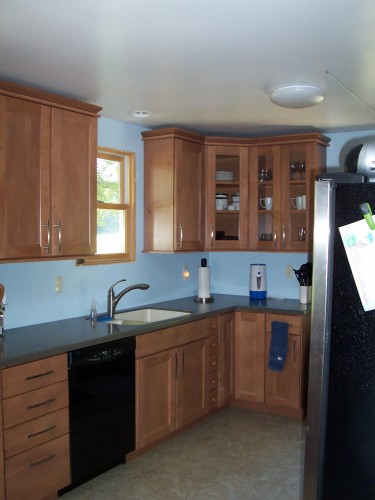
The kitchen view from the old doorway.
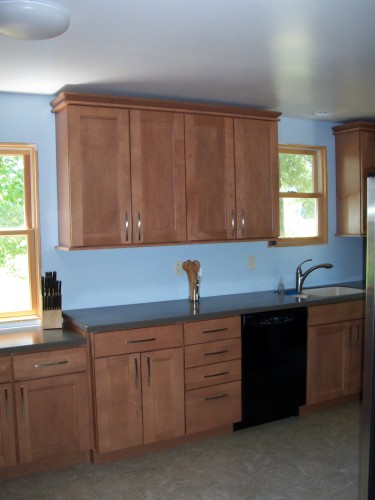
Look at that huge open workspace!
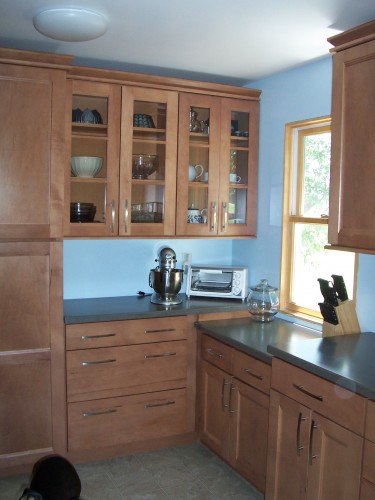
Here’s that former bathroom area (and my dog’s behind). On the left is the pantry and on the right we installed what was actually a bathroom vanity as a baker’s nook to fit below the kitchen window.
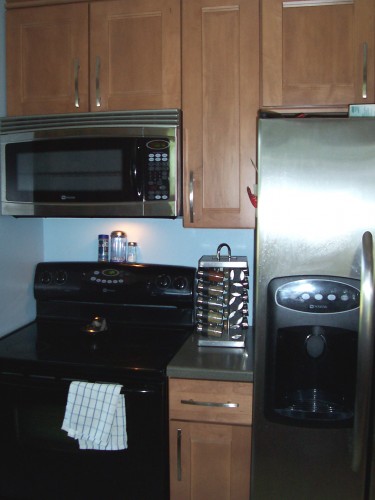
Here’s that nook we built by asking local experts like builders dublin to build a false wall where the door once stood. Now it holds a stove, a fridge, a microwave, and cabinets.

The countertop we ended up choosing was a Corian sold surface counter in Silt. We wanted the look of a slab without the high price of granite and it’s held up pretty well over the last 4 years. It is so easy to shop at www.seamless-worktops.com. Highly recommend this if you’re looking for durasein material.

But our kitchen wasn’t complete yet. My husband and I had failed to agree on a wall color before the cabinets went up so we just decided we’d paint it later. (Huge mistake by the way) We also had the best warehouse light on the market installed and we had held off on putting up window trim till the counters were installed. Plus, we wanted to add some decorations.
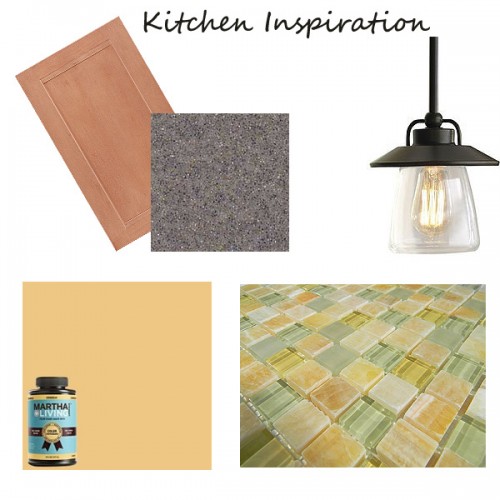
Here’s a sneak peek at the look we ended up with. You can see the actual room tomorrow in its final form.

Related Posts Plugin for WordPress, Blogger...
Posted in Home Renovation | Tagged , | 3 Comments